> For the complete documentation index, see [llms.txt](https://docs.doku.com/llms.txt). Markdown versions of documentation pages are available by appending `.md` to page URLs; this page is available as [Markdown](https://docs.doku.com/changelog/id/oktober-2026/aktivasi-dan-integrasi-shopify.md).

# Aktivasi dan Integrasi Shopify

Tanggal Efektif: 1 Oktober 2026

Menghubungkan toko Shopify Anda ke DOKU kini melalui proses terpandu. Instal DOKU Payment App, masuk ke akun DOKU Anda, lalu klik **Allow** untuk memberi izin koneksi.

Anda juga dapat mengelola integrasi melalui halaman **Manage Shopify** di DOKU Dashboard. Di sana, Anda dapat mengatur penanganan order di Shopify, mengelola akses abandoned checkout, dan menghubungkan akun Sandbox untuk pengujian.

For more information, refer to the [DOKU Documentation: \[Shopify Integration Guide\].](https://docs.doku.com/accept-payments/integration-tools/e-commerce-and-plugins/shopify/shopify-integration)

***

### What’s New?

DOKU Payment App versi terbaru menghadirkan alur koneksi terpandu dan halaman khusus untuk mengelola integrasi Shopify Anda.

* **Koneksi terpandu:** Mulai instalasi dari DOKU Dashboard atau Shopify Admin, lalu ikuti petunjuk di layar untuk memberi izin koneksi.
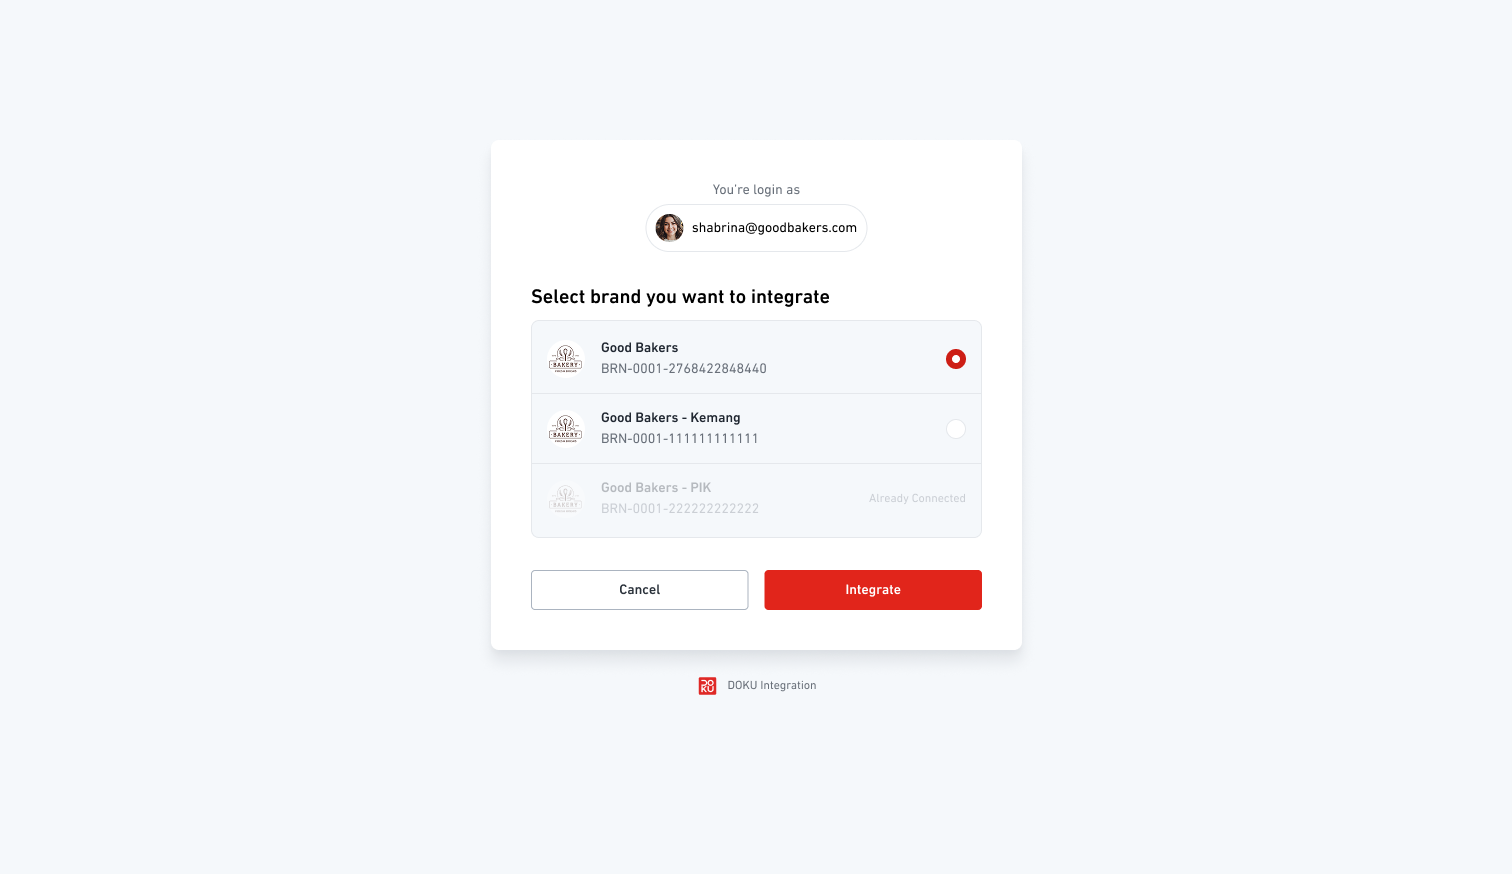
* **Pemilihan brand:** Jika Anda mengelola beberapa brand, pilih brand yang ingin dihubungkan ke toko Shopify Anda.
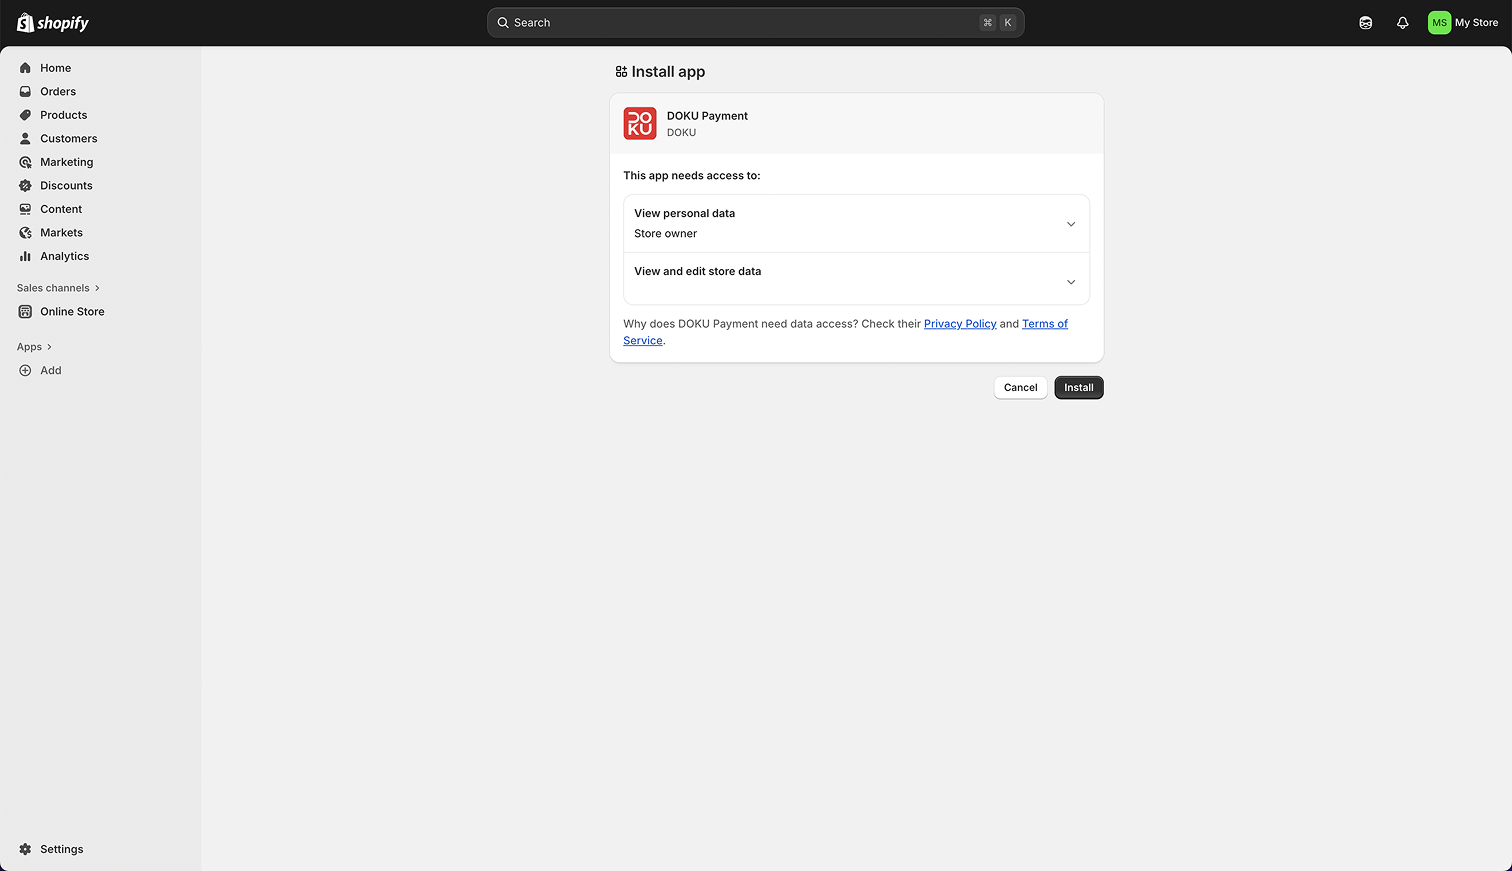
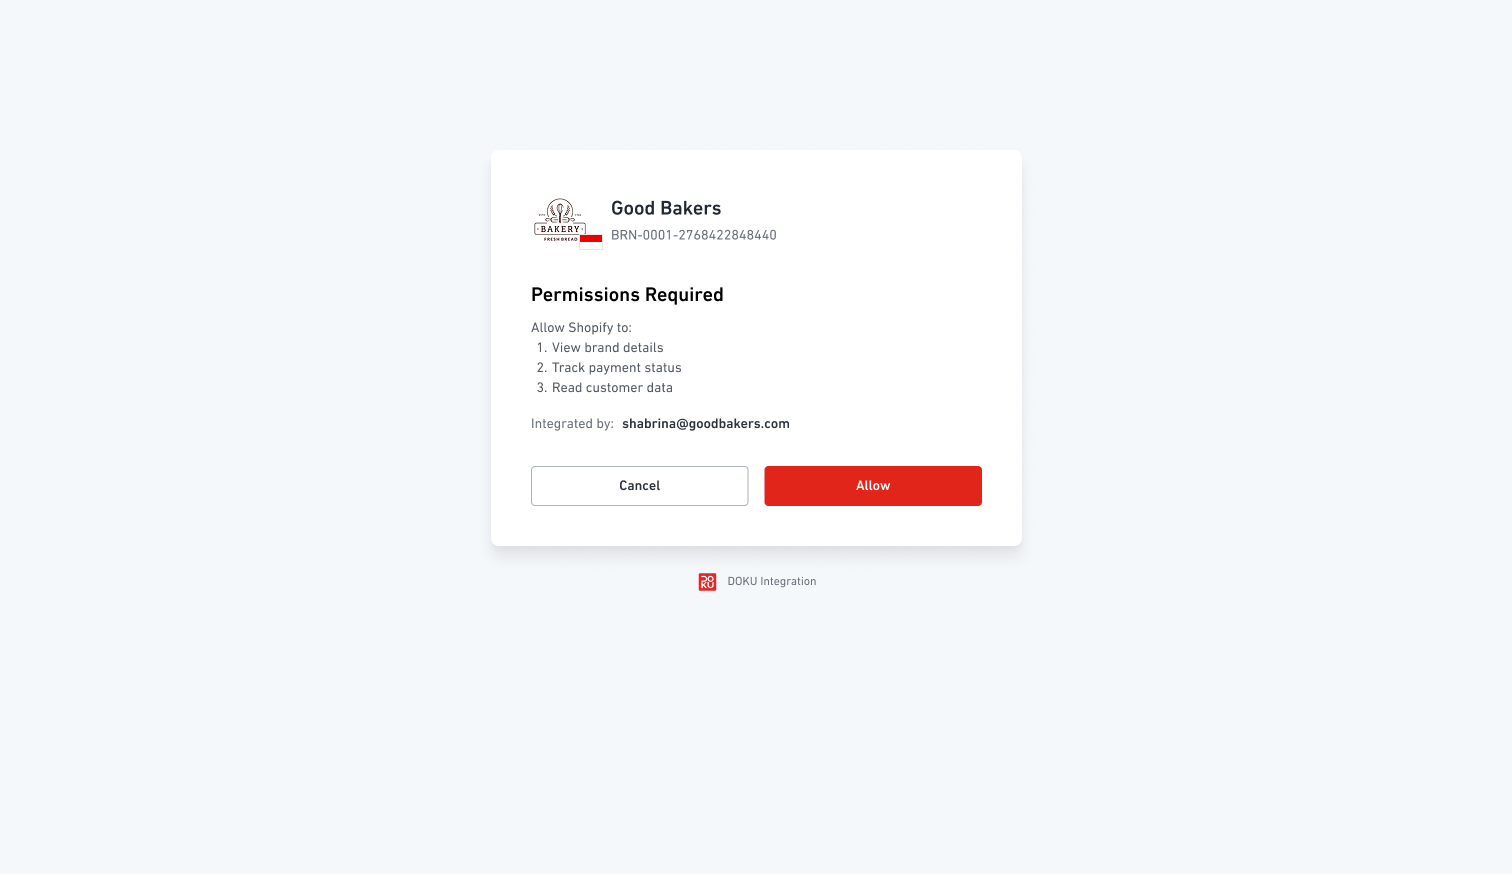
* **Peninjauan izin akses:** Tinjau izin yang diminta DOKU sebelum memberi otorisasi koneksi.
* **Pengelolaan integrasi terpusat:** Gunakan halaman Manage Shopify untuk mengatur penanganan order, mengelola akses abandoned checkout, menghubungkan Sandbox, atau menghapus integrasi (uninstall).

***

### Why It Matters

**Alur integrasi terbaru memberi cara yang lebih sederhana untuk menghubungkan toko Shopify Anda ke DOKU dan mengelola pengaturan pembayaran.**

Dengan DOKU Payment App, Anda dapat menghubungkan brand yang sesuai ke toko Anda, mengatur penanganan order dan inventaris, serta menguji integrasi di Sandbox sebelum menerima pembayaran live.

***

### How to Get Started&#x20;

Ikuti langkah-langkah berikut untuk menghubungkan toko Shopify Anda ke DOKU. Langkah masuk dan pemilihan brand hanya muncul jika berlaku untuk akun Anda.

#### 1. Install Shopify Platform

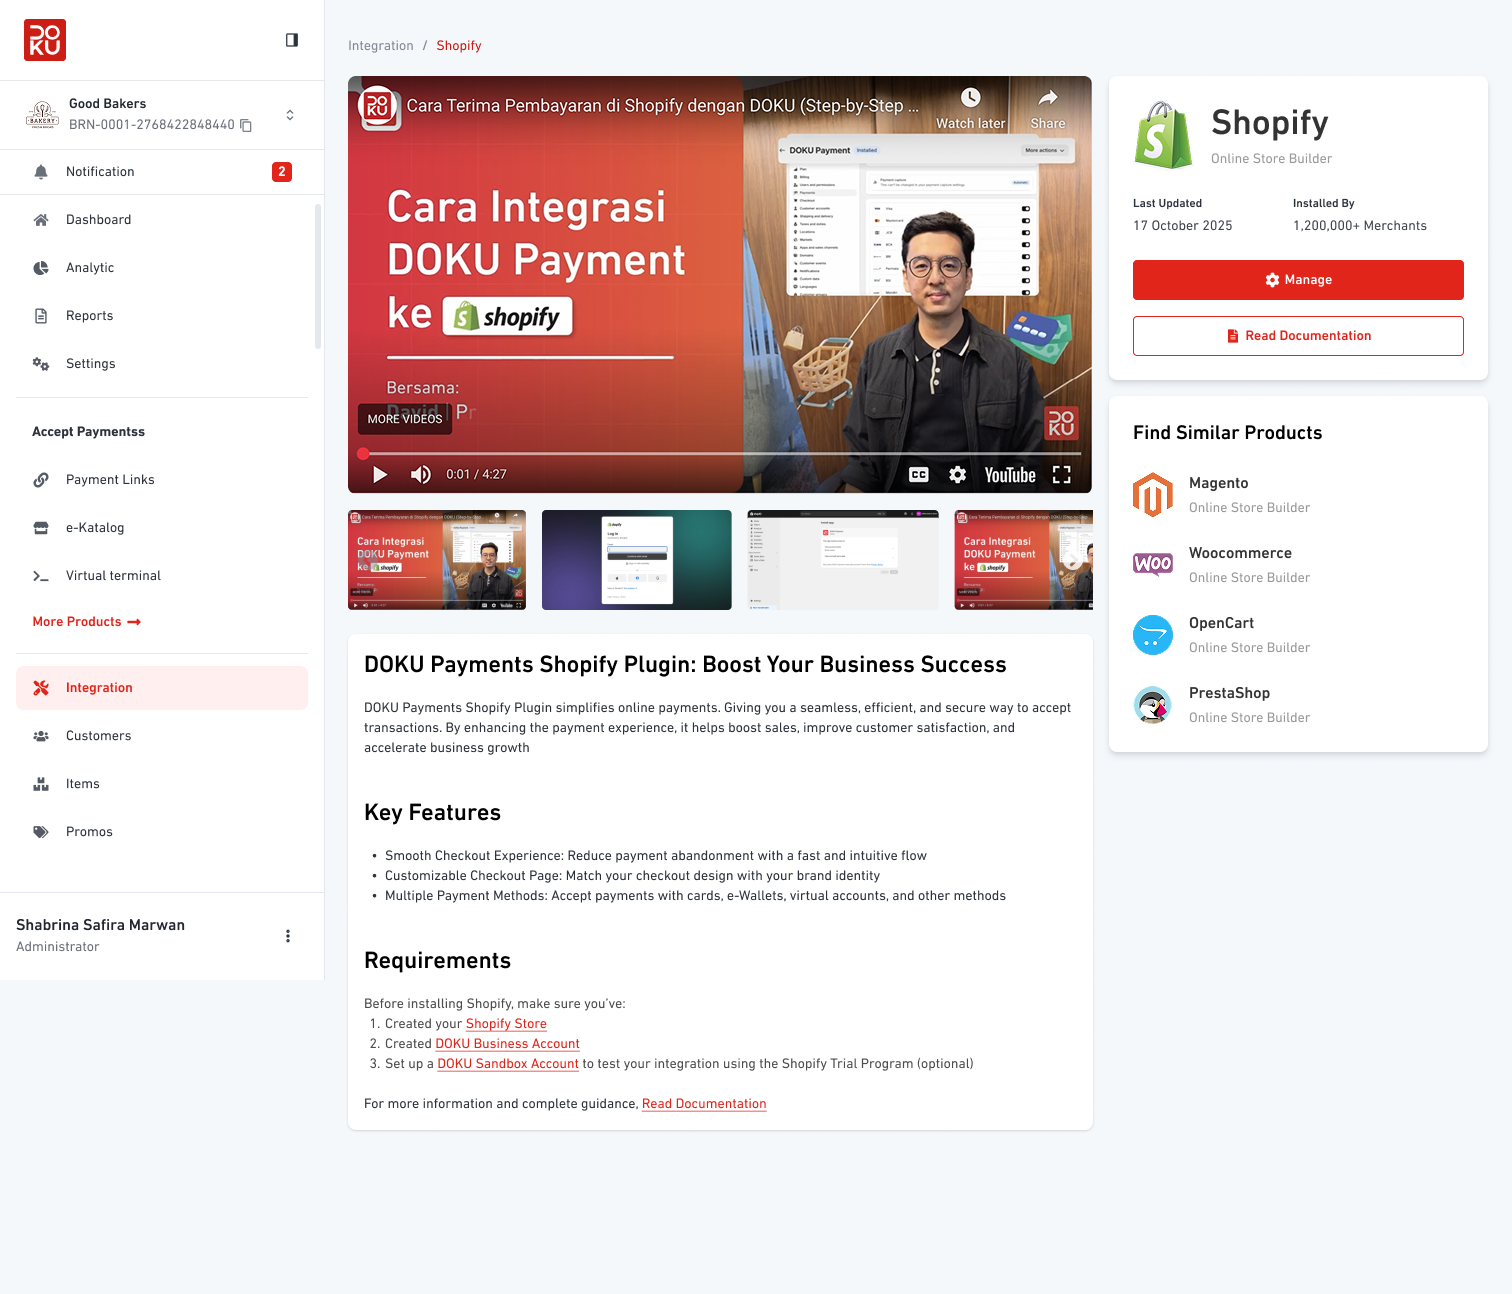
Anda dapat memulai instalasi dari DOKU Dashboard atau Shopify Admin.

**Option 1: From DOKU Dashboard**

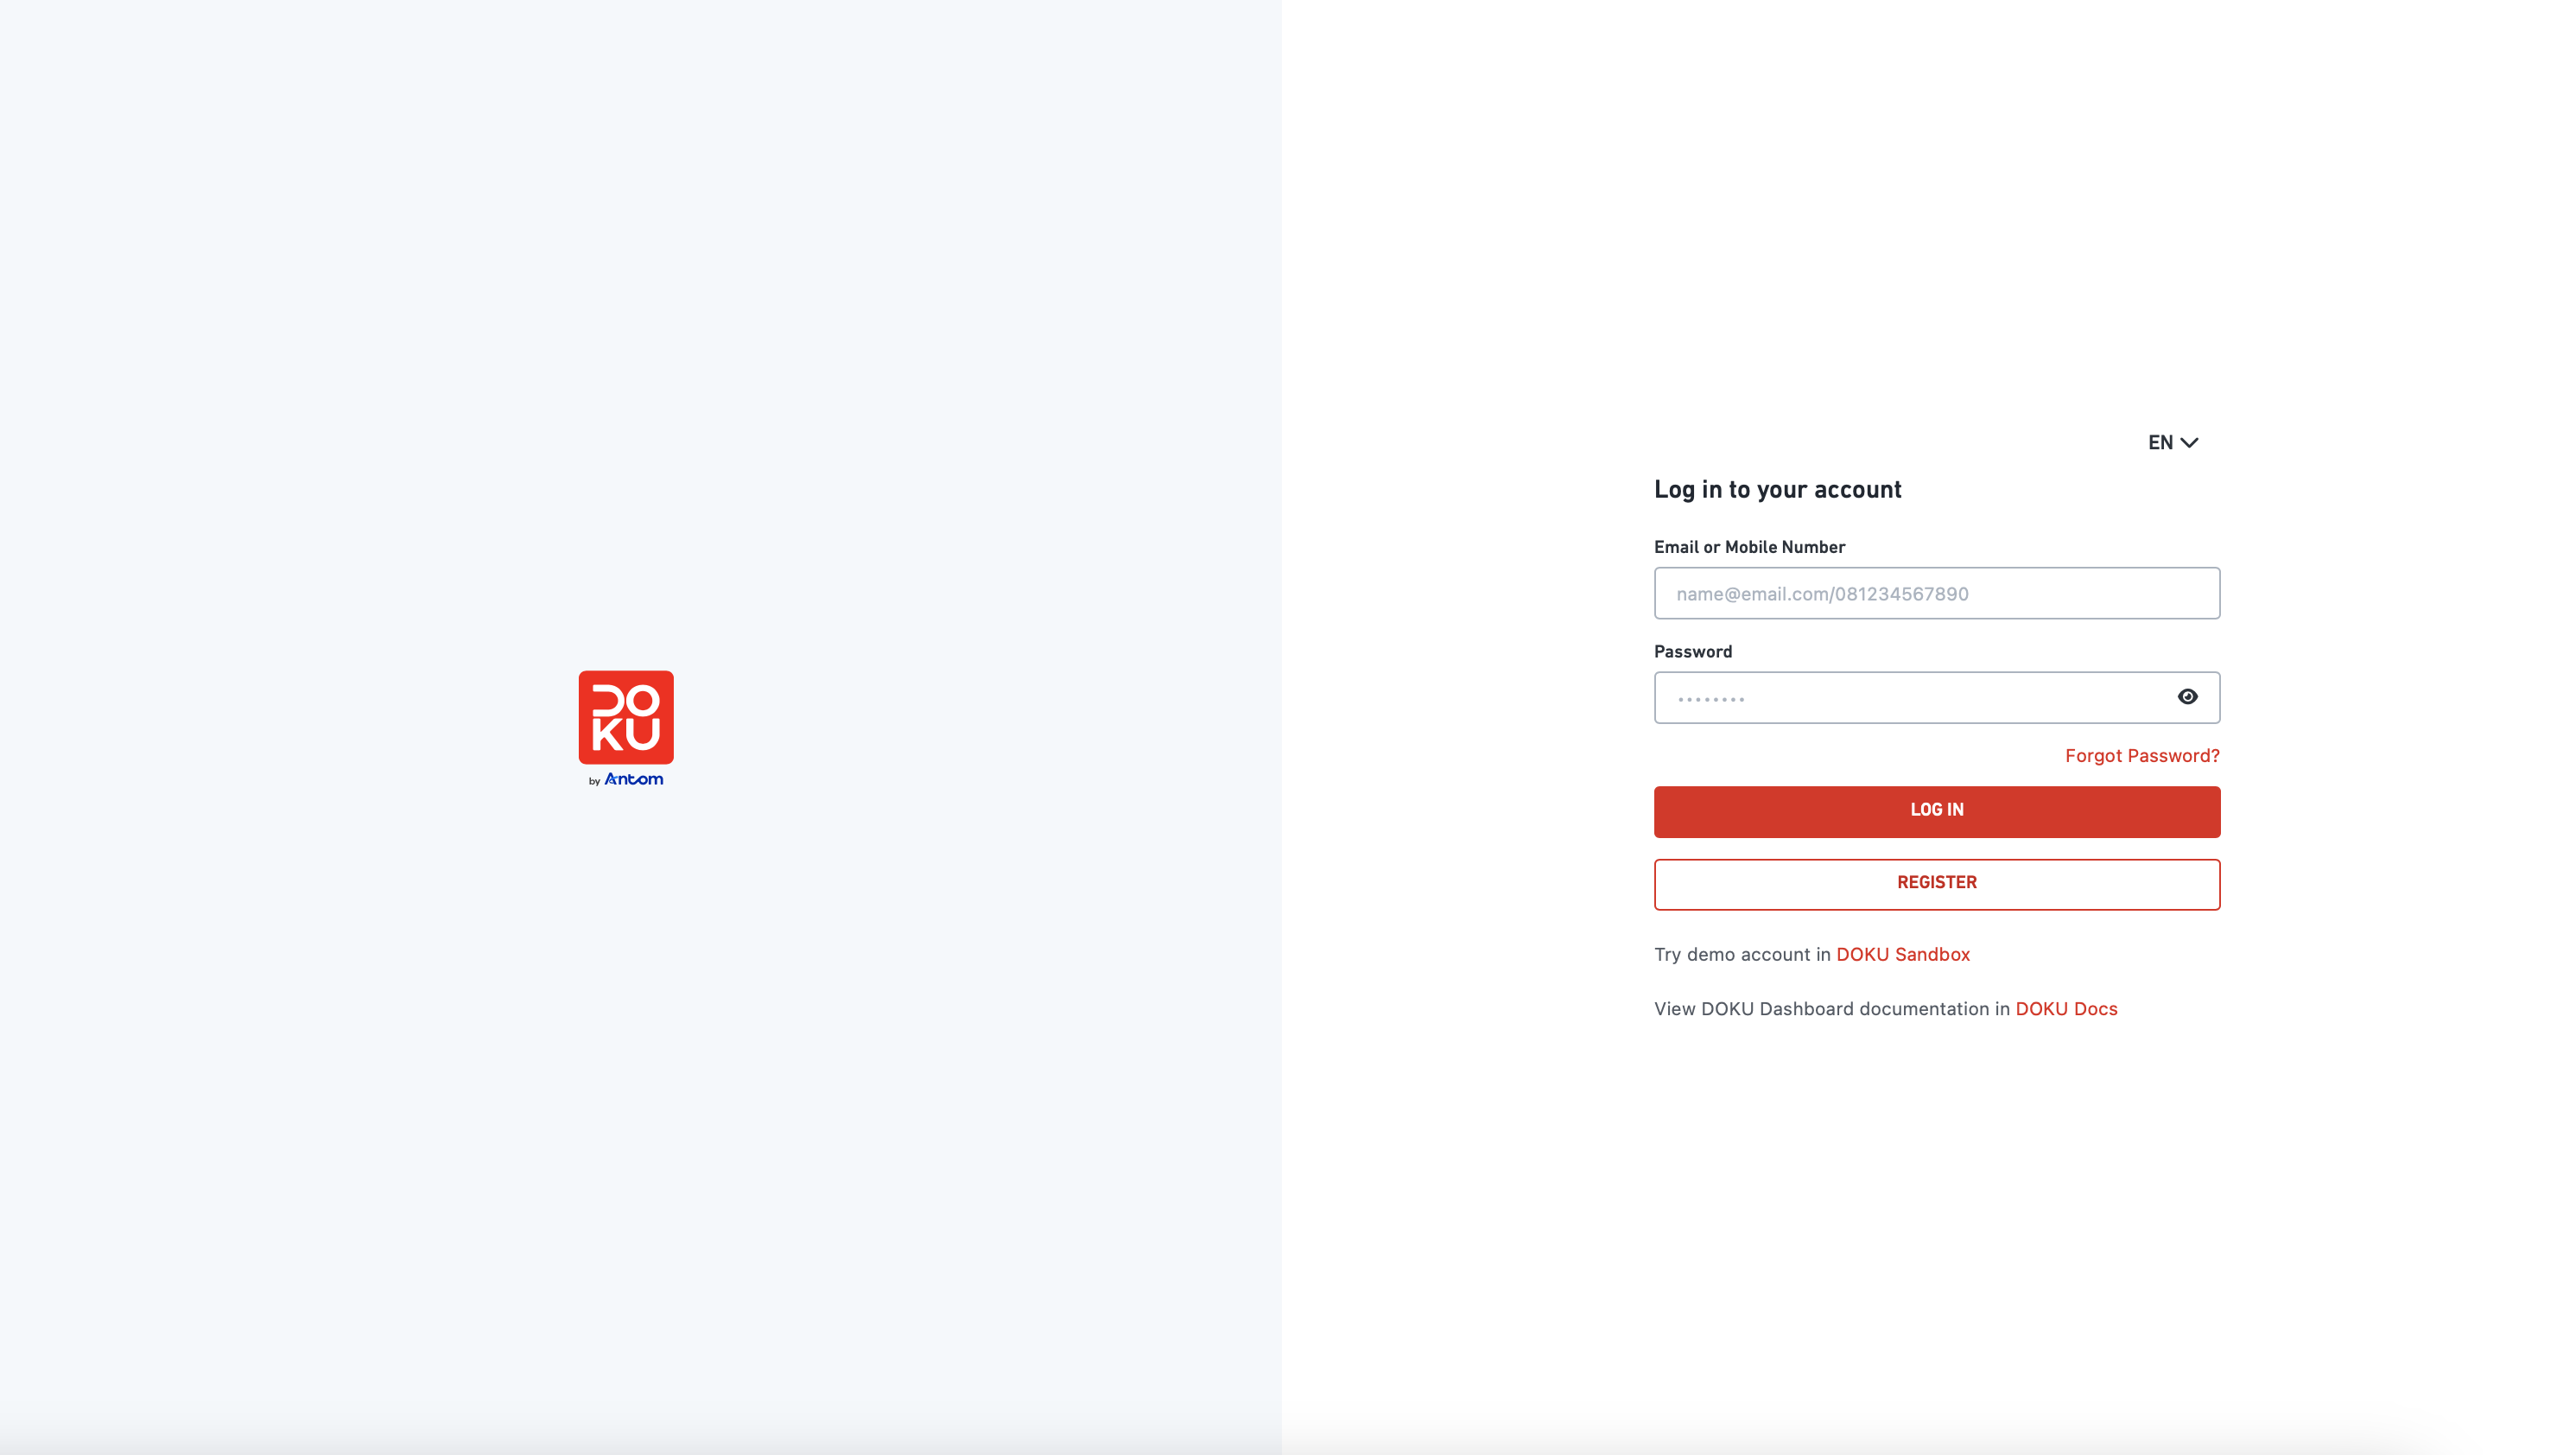
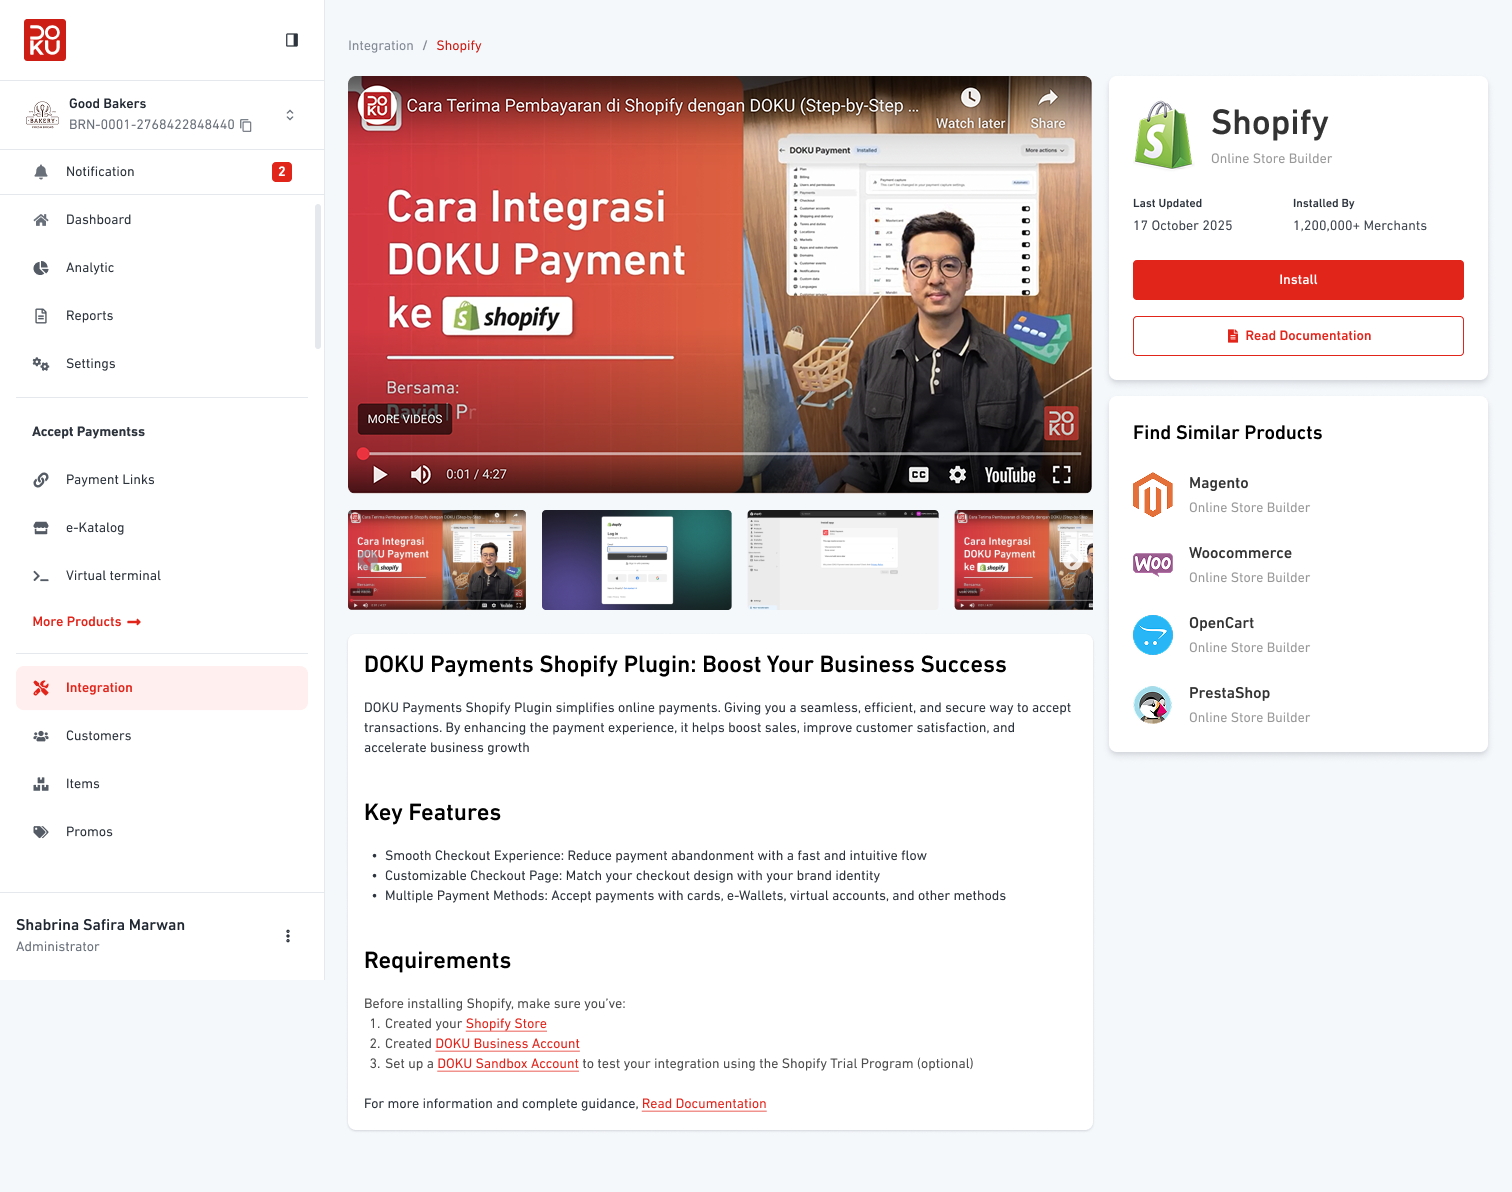
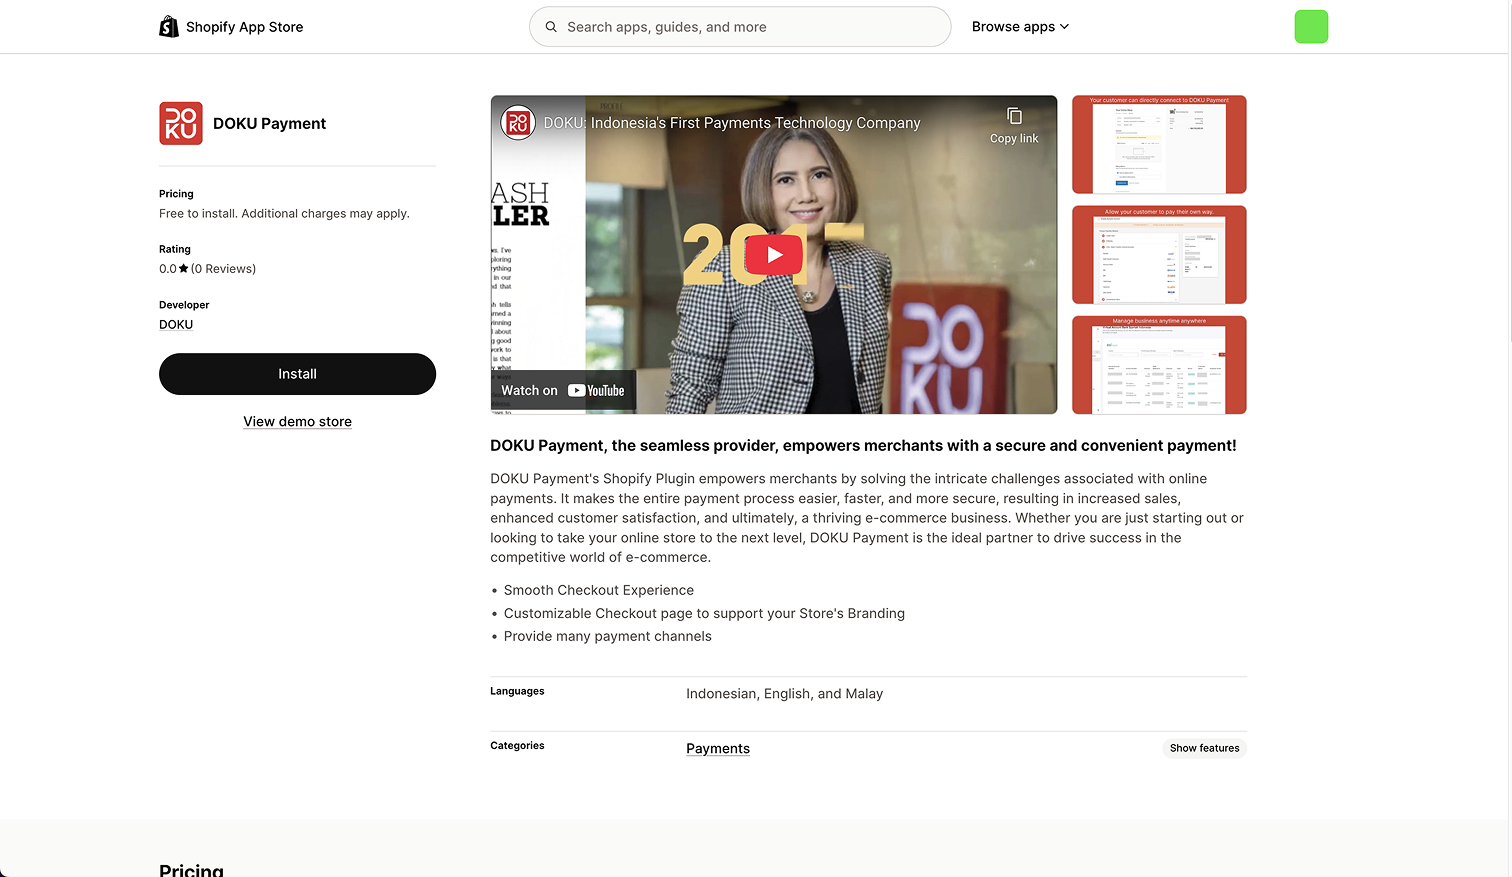
<table data-header-hidden><thead><tr><th width="374"></th><th></th></tr></thead><tbody><tr><td><p></p><p>Masuk ke DOKU Dashboard.</p></td><td><p></p><p><img src="https://content.gitbook.com/content/59kAiNPhKLBfYtIIQwo9/blobs/J1l6eEBgeb3jZcNKa12U/Screenshot%202026-10-25%20at%2018.18.12.png" alt="" data-size="original"></p><p></p></td></tr><tr><td>Buka Integration → Shopify, lalu klik Install.</td><td><img src="https://content.gitbook.com/content/59kAiNPhKLBfYtIIQwo9/blobs/UrQyygvtZ8UmPkQ8Xiie/detail%20plugin.png" alt=""></td></tr><tr><td>Di Shopify App Store, pilih DOKU Payment App, lalu klik Install.</td><td><img src="https://content.gitbook.com/content/59kAiNPhKLBfYtIIQwo9/blobs/miYlx7WjlNx6zrum6wOd/Screen%20Shot%202025-09-24%20at%2014.34.29.png" alt=""></td></tr></tbody></table>

**Option 2: From Shopify Admin**

<table data-header-hidden><thead><tr><th width="374"></th><th></th></tr></thead><tbody><tr><td><p></p><p>Masuk ke Shopify Admin.</p></td><td><p></p><p><img src="https://content.gitbook.com/content/59kAiNPhKLBfYtIIQwo9/blobs/8rRkevgmBzi2XFjzsshl/Screenshot%202026-10-25%20at%2018.31.16.png" alt=""></p><p></p></td></tr><tr><td>Buka Settings → Payments.</td><td><img src="https://content.gitbook.com/content/59kAiNPhKLBfYtIIQwo9/blobs/miYlx7WjlNx6zrum6wOd/Screen%20Shot%202025-09-24%20at%2014.34.29.png" alt=""></td></tr><tr><td>Di Shopify App Store, pilih DOKU Payment App, lalu klik Install.</td><td><img src="https://content.gitbook.com/content/59kAiNPhKLBfYtIIQwo9/blobs/oqNPyjYNru5G5b0xyohH/Screen%20Shot%202025-09-24%20at%2014.34.56.png" alt=""></td></tr></tbody></table>

#### 2. Masuk ke DOKU

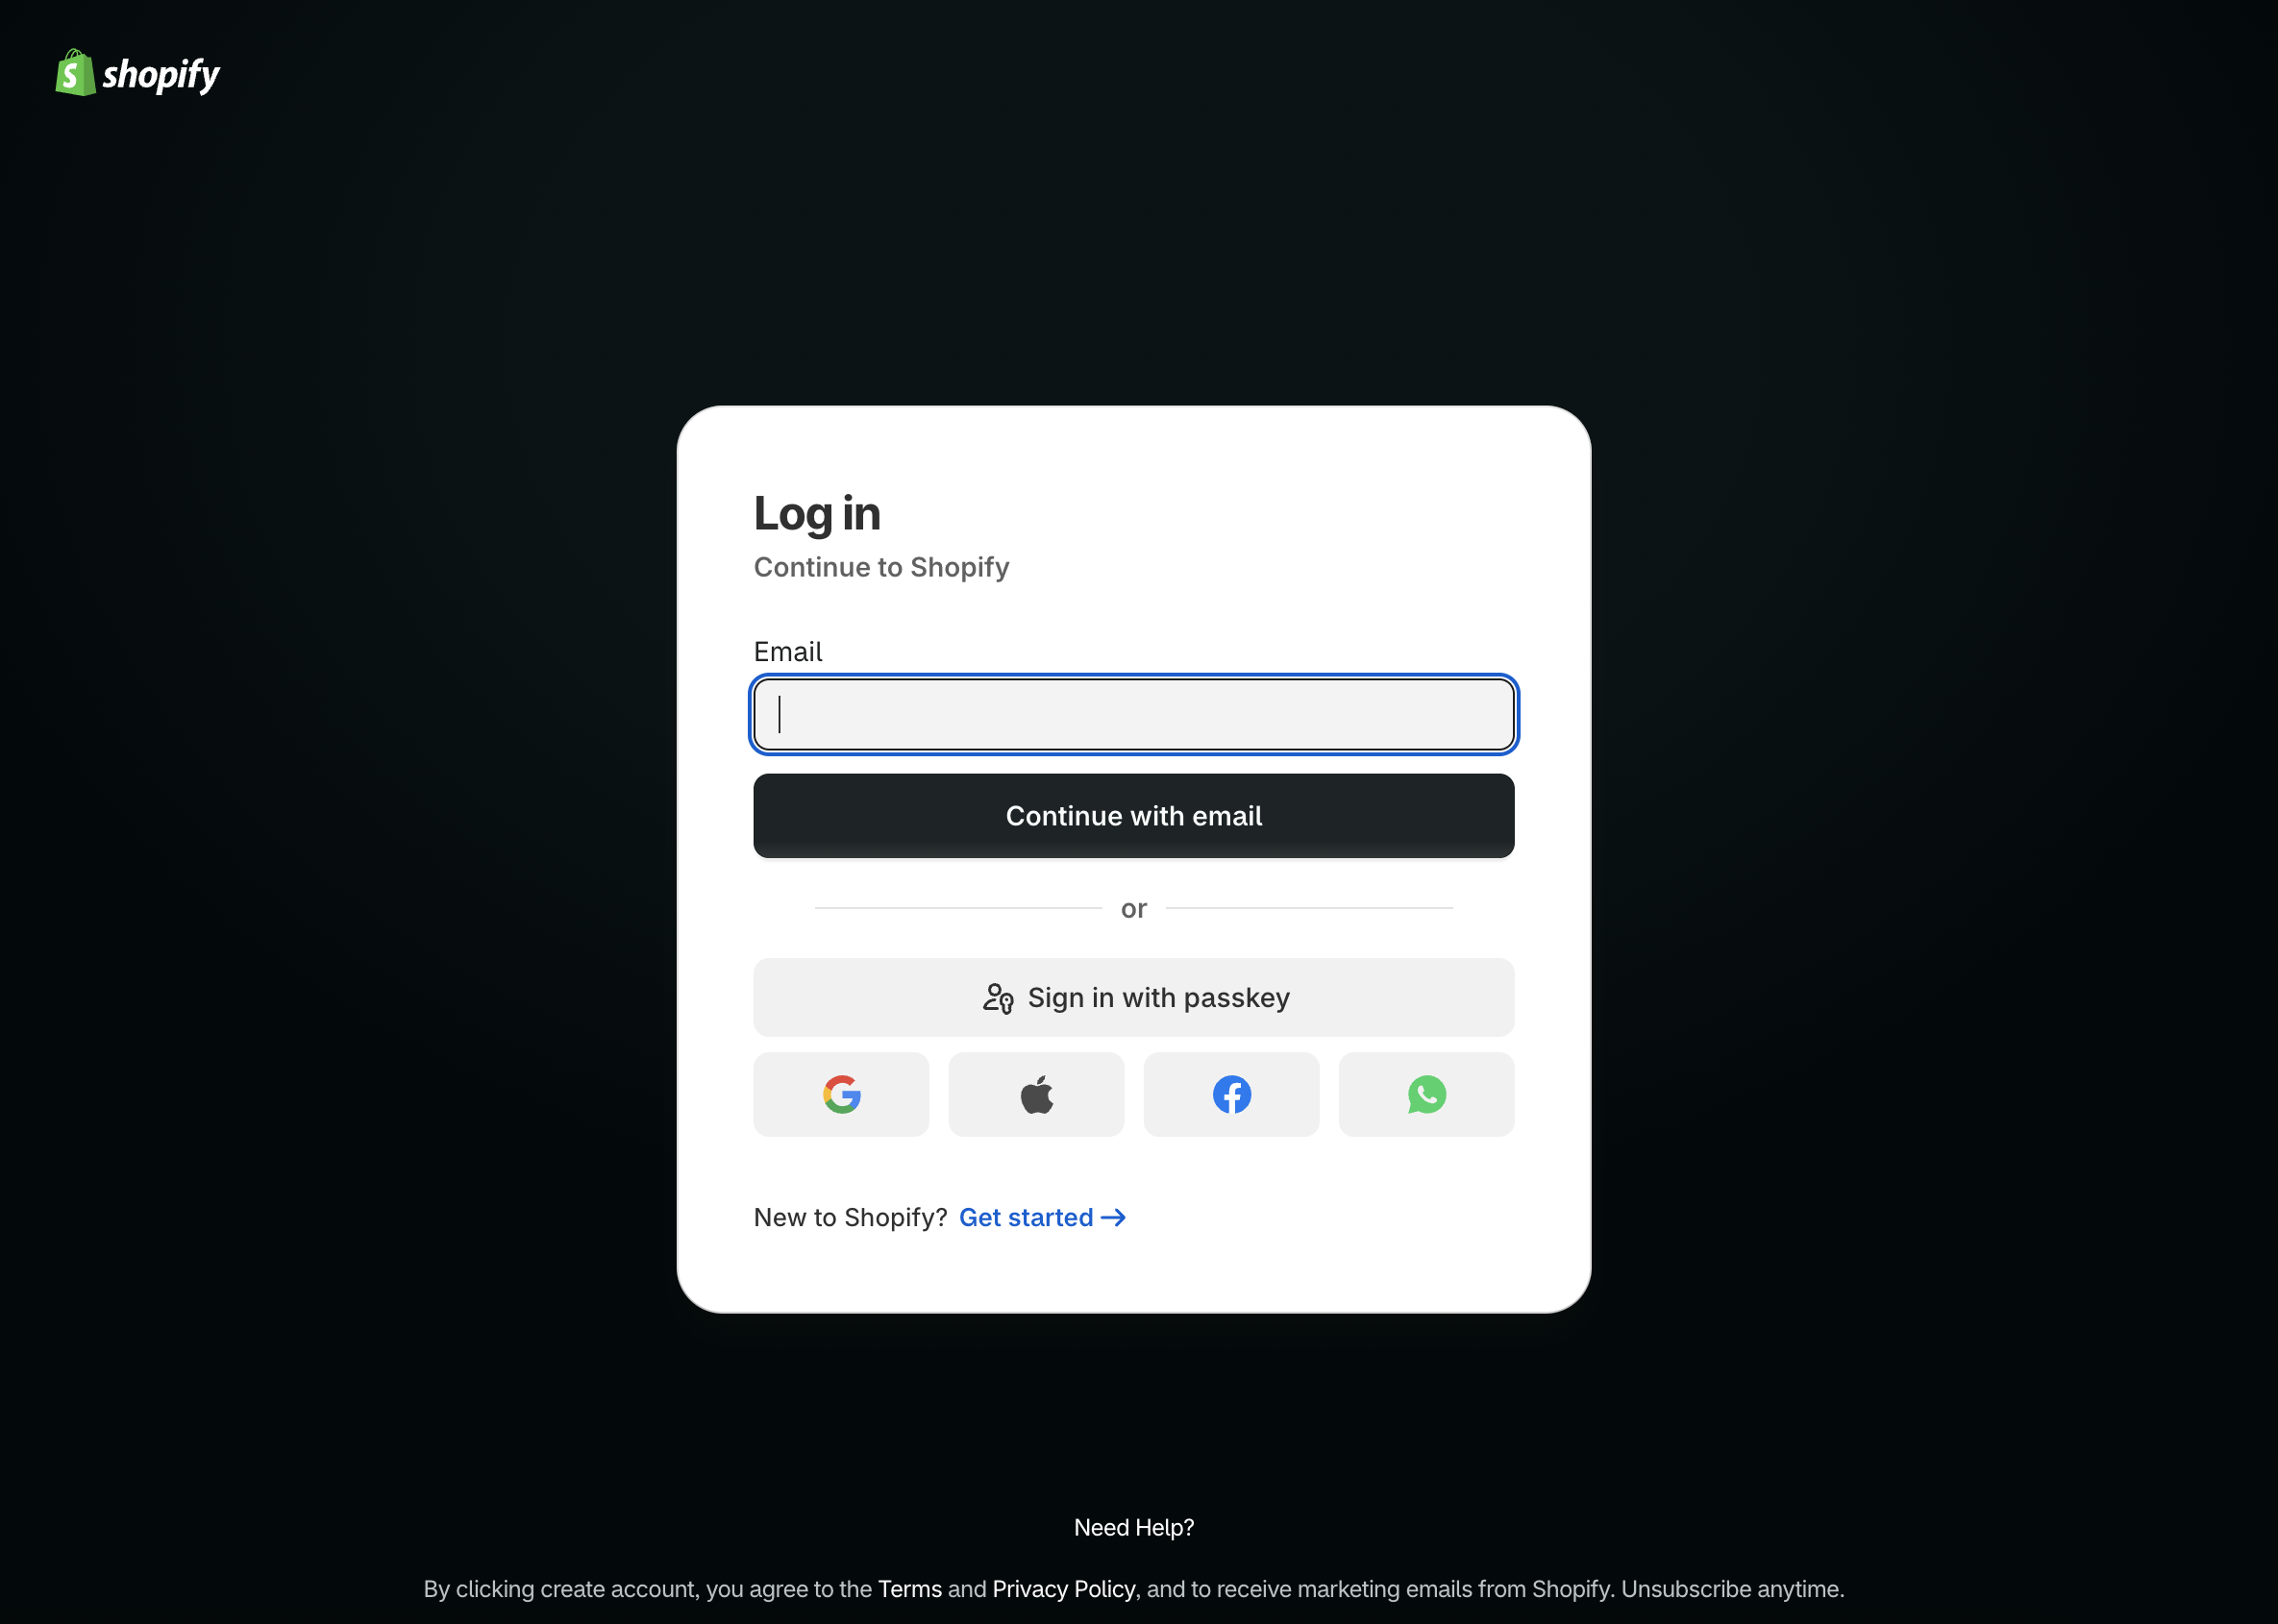
Setelah instalasi, DOKU memeriksa apakah Anda sudah masuk.

* **Jika sudah masuk:** Anda akan diarahkan ke halaman otorisasi.
* **Jika belum masuk:** Tab browser baru akan terbuka di halaman login DOKU Dashboard. Setelah masuk, Anda akan diarahkan ke halaman otorisasi.

{% columns %}
{% column width="50%" %}

<figure><img src="https://content.gitbook.com/content/59kAiNPhKLBfYtIIQwo9/blobs/p4ivKIwUnnuKvANobdKu/detail%20plugin.png" alt=""><figcaption></figcaption></figure>

Sudah Masuk
{% endcolumn %}

{% column width="50%" %}

<figure><img src="https://content.gitbook.com/content/59kAiNPhKLBfYtIIQwo9/blobs/J1l6eEBgeb3jZcNKa12U/Screenshot%202026-10-25%20at%2018.18.12.png" alt=""><figcaption></figcaption></figure>

Belum Masuk
{% endcolumn %}
{% endcolumns %}

#### 3. Pilih Brand Anda

* Jika akun Anda mengelola beberapa brand, pilih brand yang ingin dihubungkan ke toko Shopify Anda, lalu klik **Integrate**.
* Jika akun Anda hanya memiliki satu brand yang memenuhi syarat, langkah pemilihan brand mungkin tidak diperlukan.

{% columns %}
{% column width="50%" %}

<figure><img src="https://content.gitbook.com/content/59kAiNPhKLBfYtIIQwo9/blobs/p4ivKIwUnnuKvANobdKu/detail%20plugin.png" alt=""><figcaption></figcaption></figure>

Satu Brand
{% endcolumn %}

{% column width="50%" %}

<figure><img src="https://content.gitbook.com/content/59kAiNPhKLBfYtIIQwo9/blobs/wLT6eyj2nUrm6EcnoXxu/detail%20plugin.png" alt=""><figcaption></figcaption></figure>

Beberapa Brand
{% endcolumn %}
{% endcolumns %}

#### 4. Tinjau dan Berikan Izin Akses

Tinjau izin yang diminta DOKU, termasuk akses ke detail brand, status pembayaran, dan data pelanggan. Klik **Allow** untuk memberi otorisasi koneksi.

#### 5. Konfirmasi Koneksi

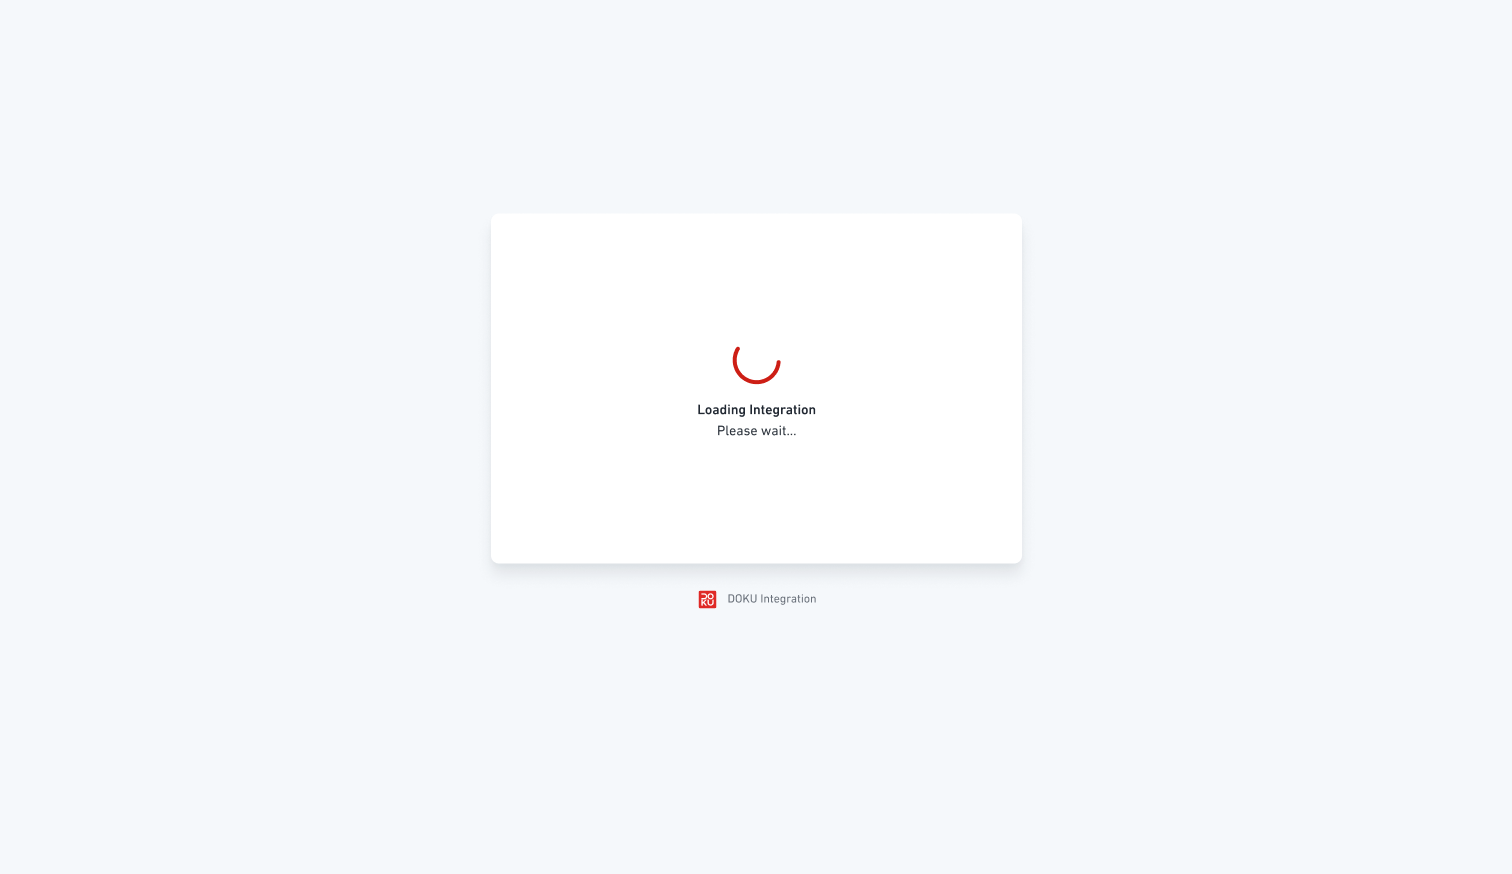
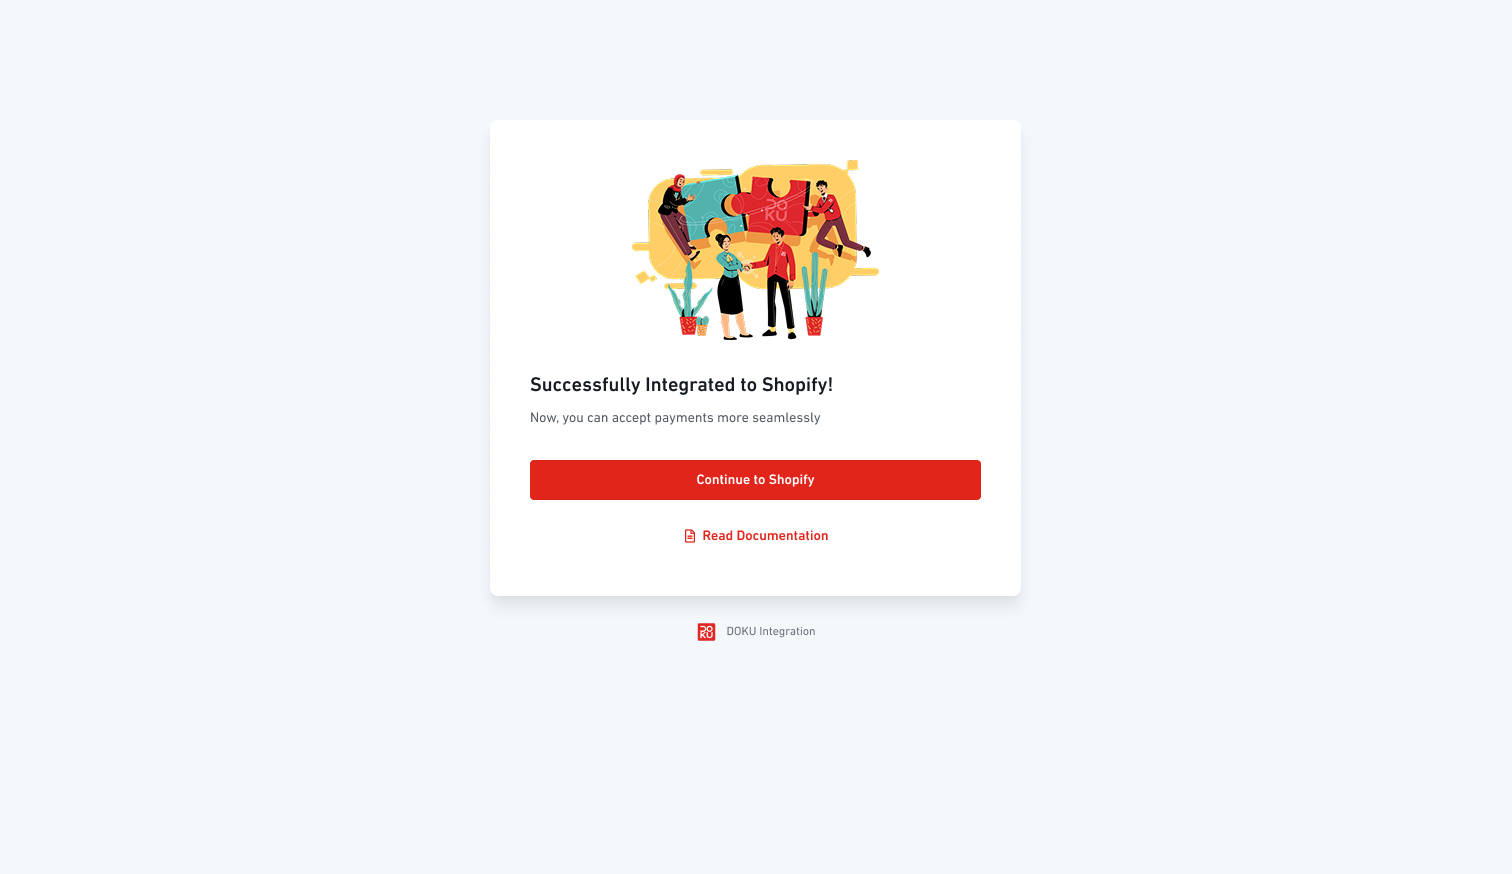
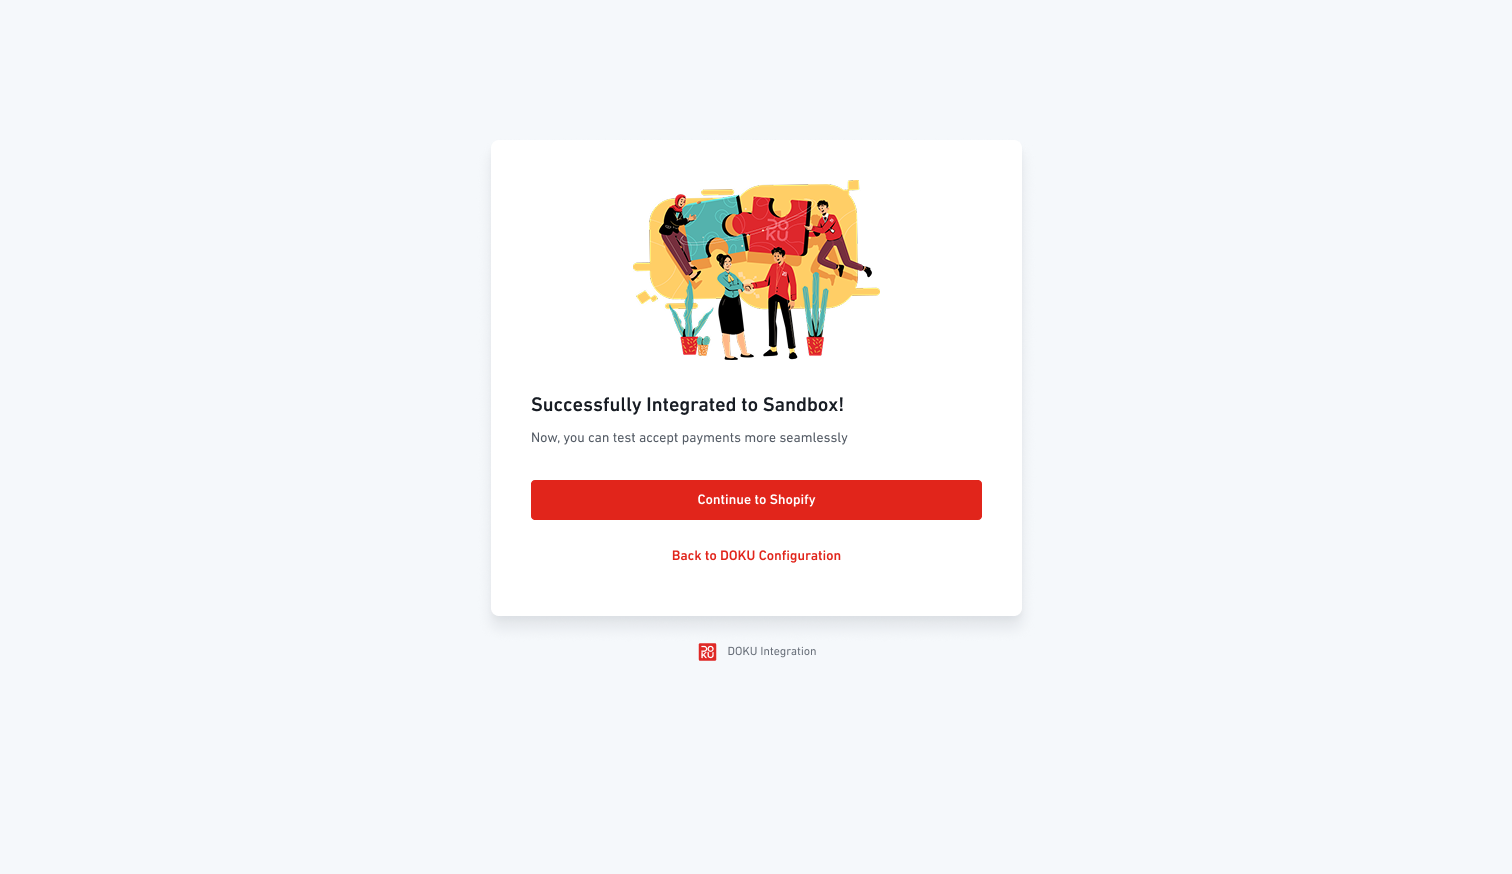
Setelah koneksi berhasil, halaman konfirmasi akan muncul. Klik **Continue to Shopify** untuk kembali ke Shopify.

{% columns %}
{% column width="50%" %}

<figure><img src="https://content.gitbook.com/content/59kAiNPhKLBfYtIIQwo9/blobs/l4WD8ZiCBgyW1uqFDGcL/detail%20plugin.png" alt=""><figcaption></figcaption></figure>

Sedang Proses
{% endcolumn %}

{% column width="50%" %}

<figure><img src="https://content.gitbook.com/content/59kAiNPhKLBfYtIIQwo9/blobs/C4bUtHGDVQ1Gl8wjUByk/detail%20plugin.png" alt=""><figcaption></figcaption></figure>

Koneksi Berhasil
{% endcolumn %}
{% endcolumns %}

#### 6. Aktifkan DOKU Payment

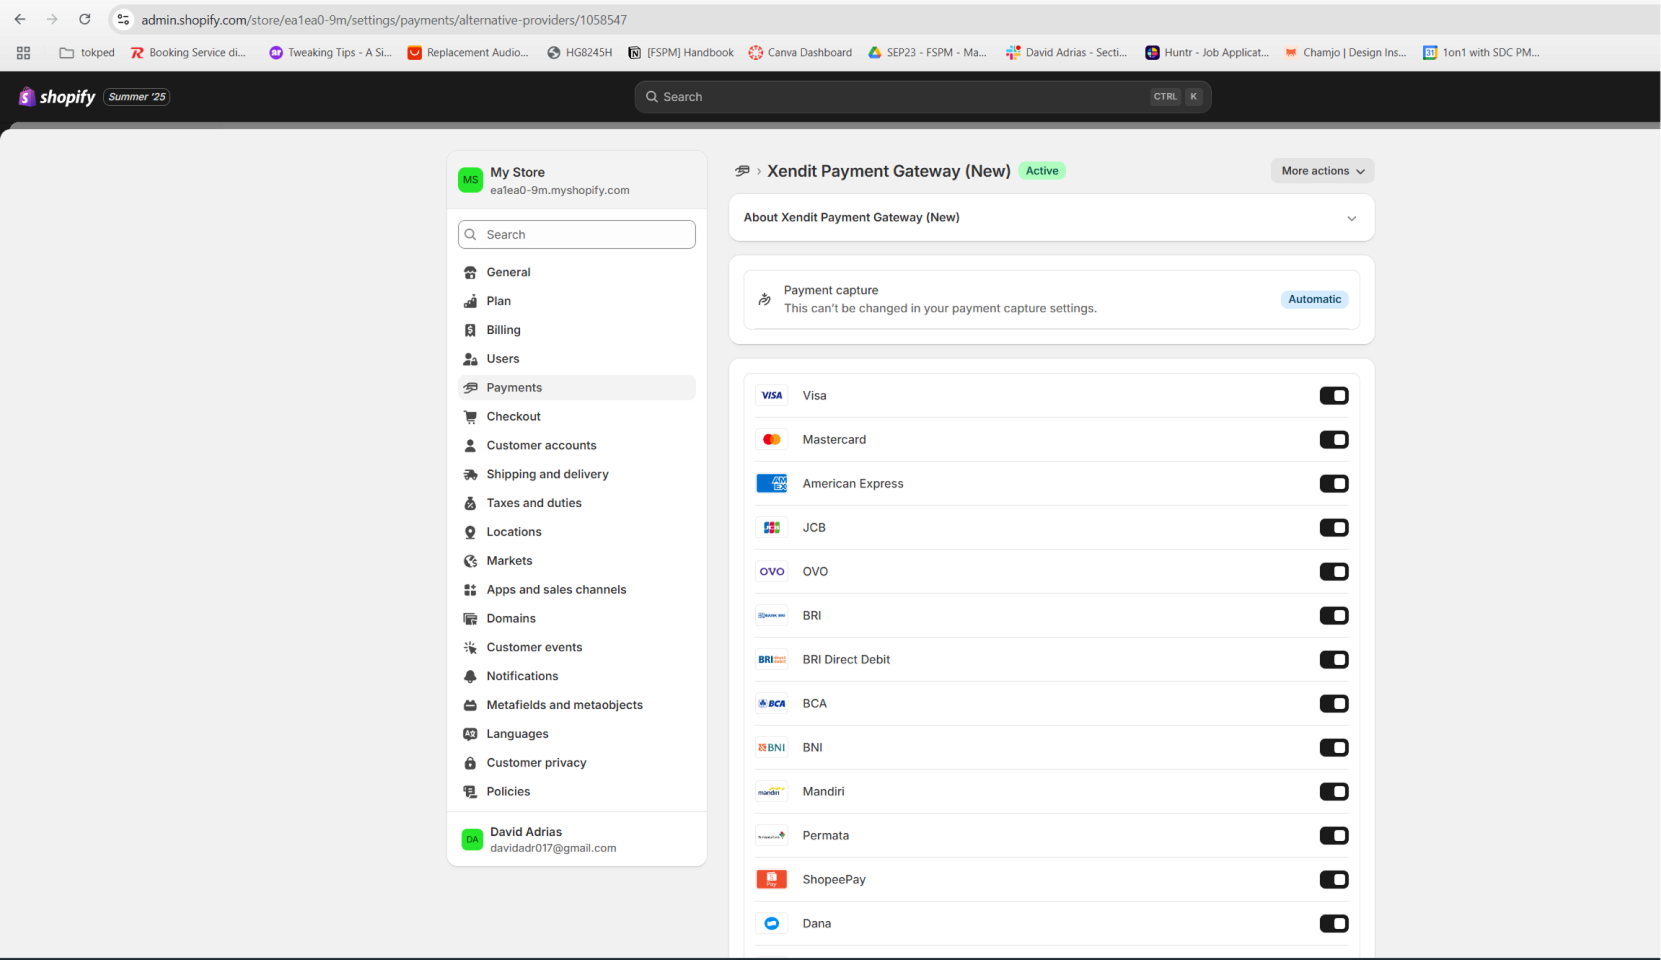
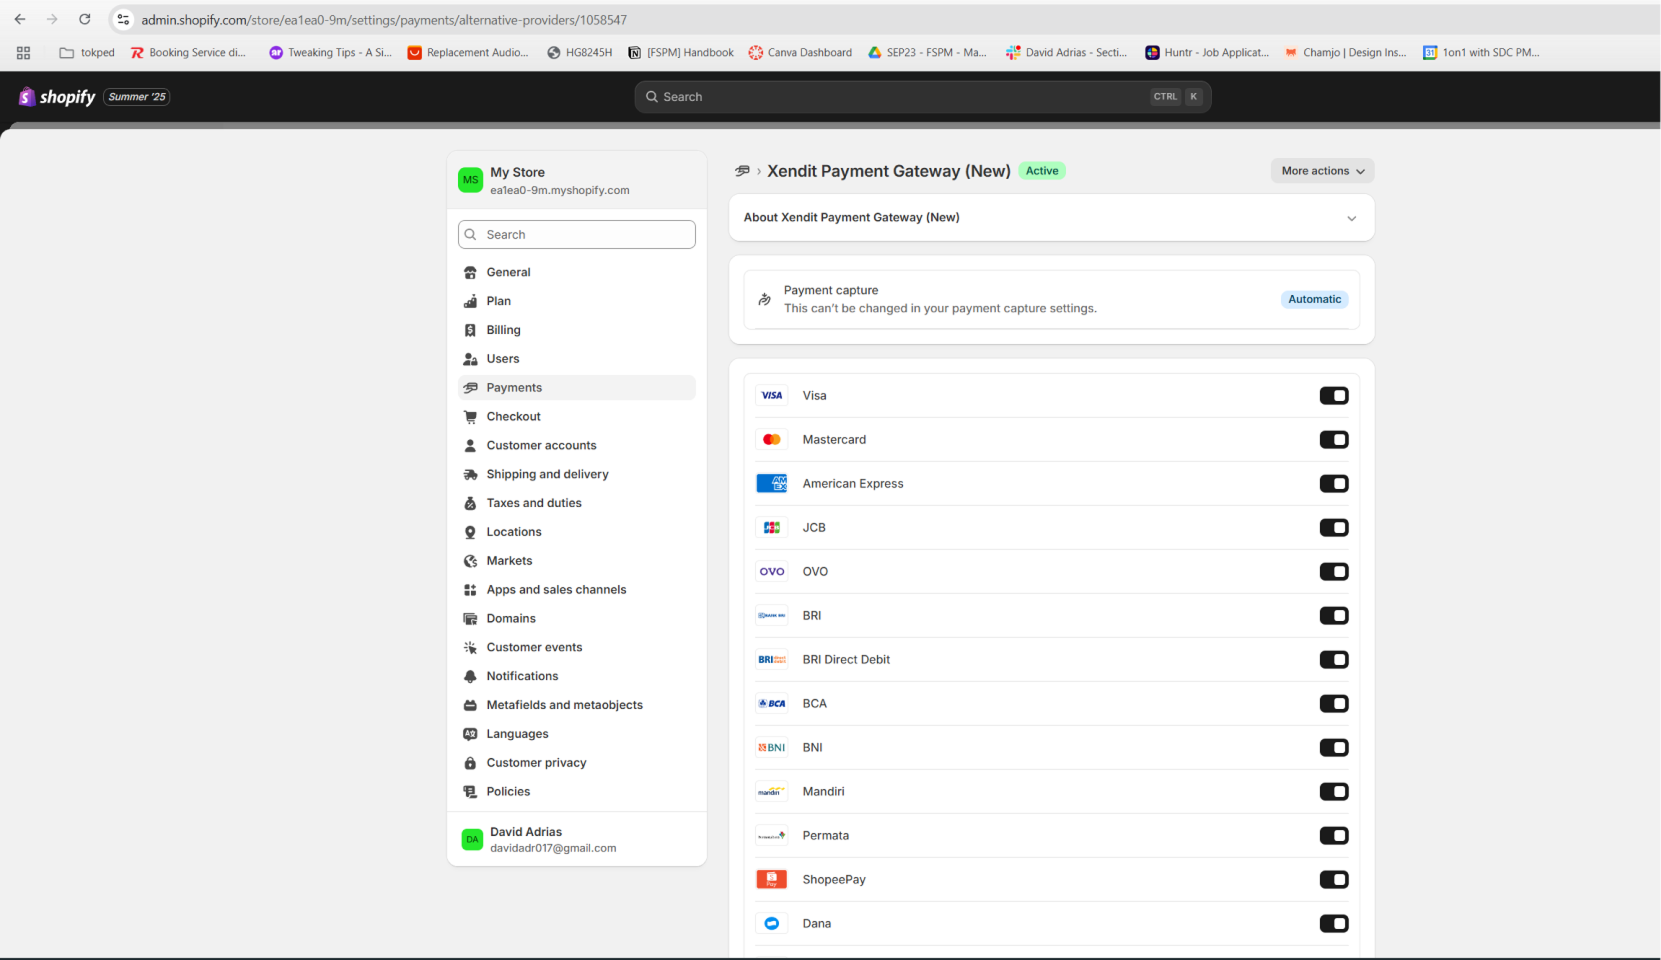
Di Shopify Admin, buka pengaturan DOKU Payment. Aktifkan ikon pembayaran yang ingin ditampilkan di checkout, lalu gulir ke bawah dan klik **Activate**.

<figure><img src="https://content.gitbook.com/content/59kAiNPhKLBfYtIIQwo9/blobs/fTNTmwhk4zboMUtlJTUg/image%203.png" alt=""><figcaption></figcaption></figure>

***

### **Kelola Integrasi Anda**

Anda dapat mengakses halaman **Manage Shopify** dari dua tempat:

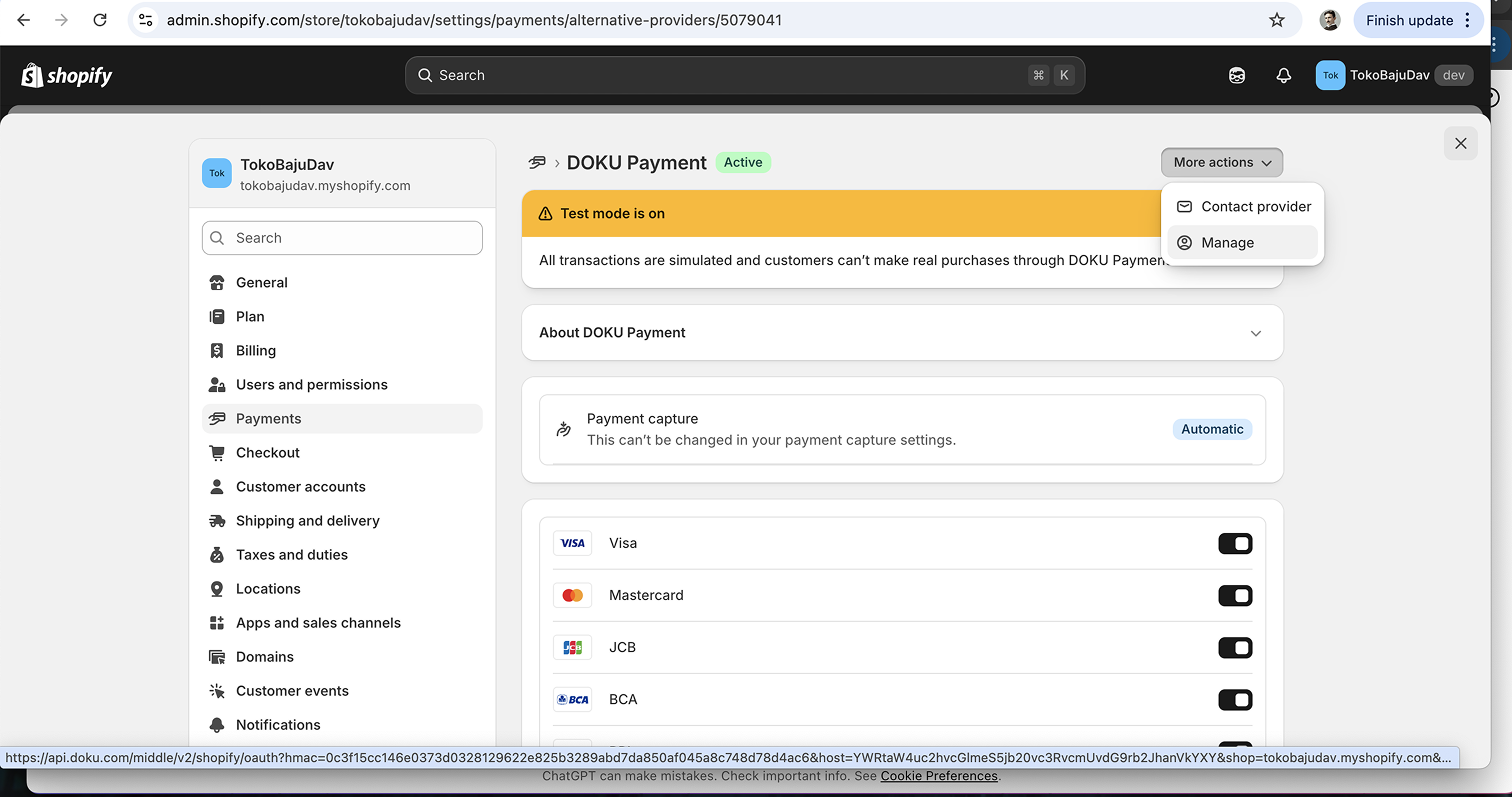
* **DOKU Dashboard:** Buka **Integration → Shopify → Manage**.
* **Shopify Admin:** Buka DOKU Payment App, lalu pilih **More actions → Manage**.

{% columns %}
{% column width="50%" %}

<figure><img src="https://content.gitbook.com/content/59kAiNPhKLBfYtIIQwo9/blobs/1ogCVe31I5k0kIQQxkyW/detail%20plugin.png" alt=""><figcaption></figcaption></figure>

DOKU Dashboard
{% endcolumn %}

{% column width="50%" %}

<figure><img src="https://content.gitbook.com/content/59kAiNPhKLBfYtIIQwo9/blobs/vpxSW8vJhLntR2Szb3qn/image%20(1)%201.png" alt=""><figcaption></figcaption></figure>

Shopify&#x20;
{% endcolumn %}
{% endcolumns %}

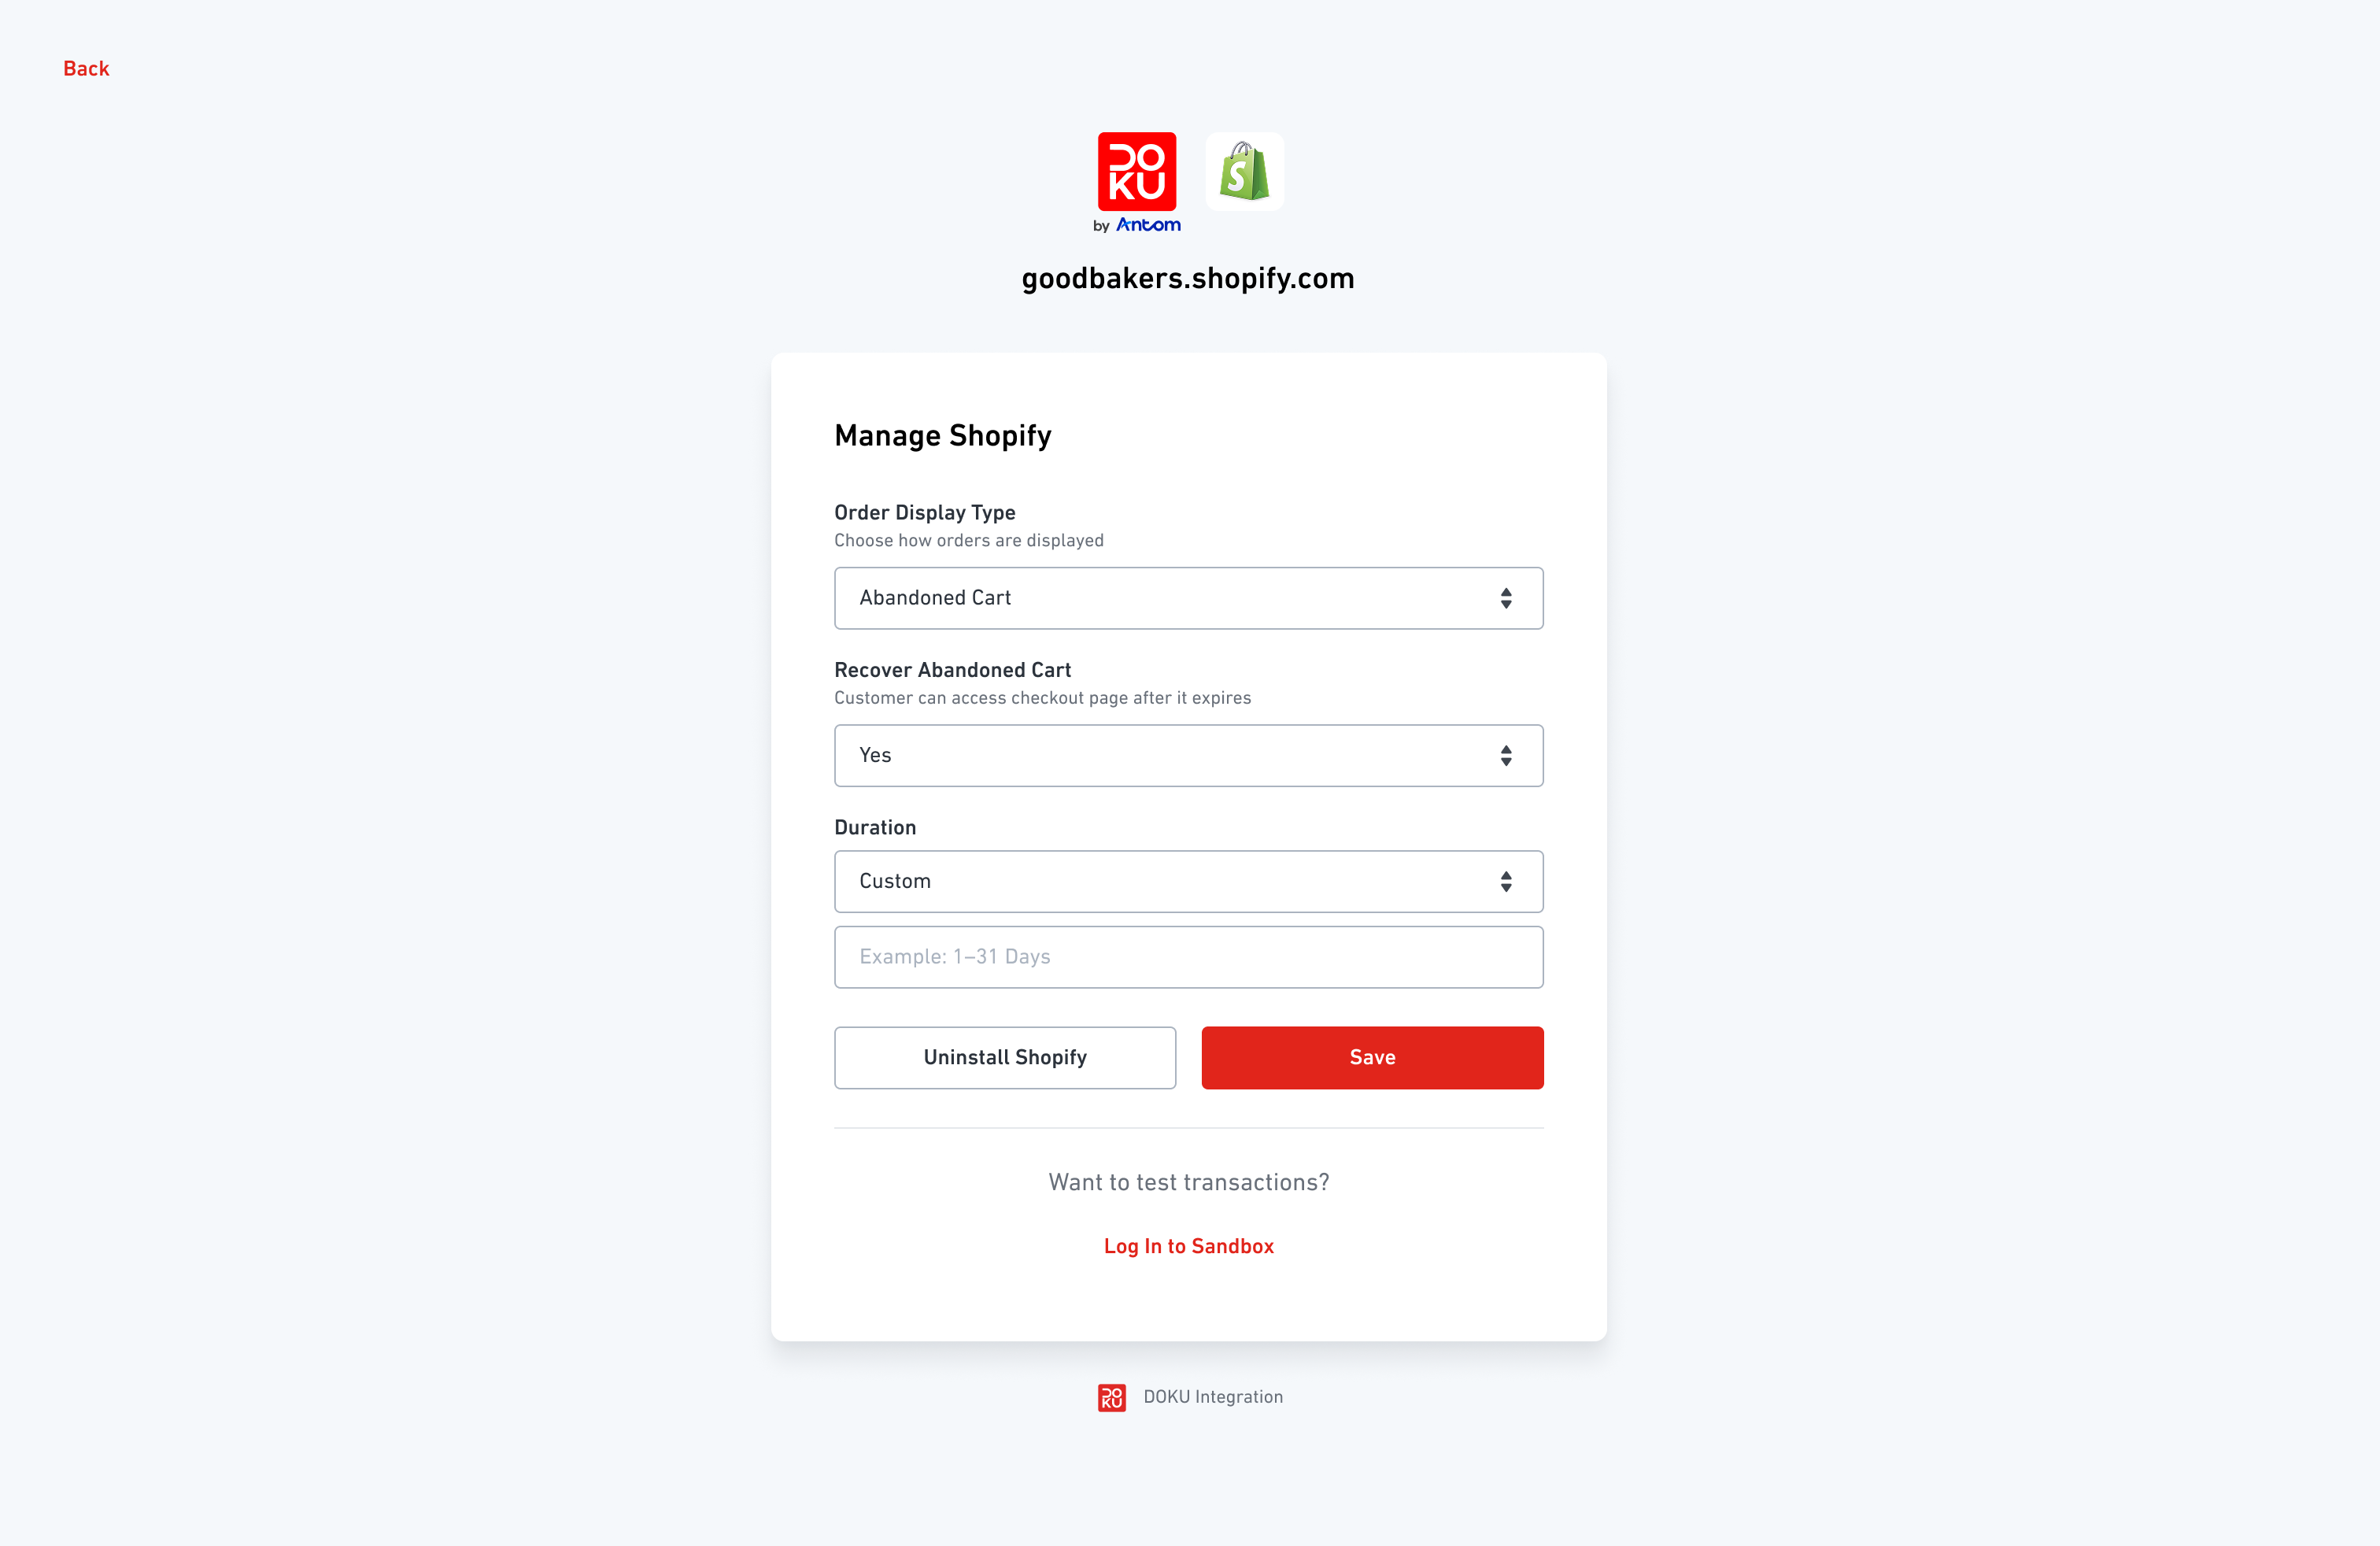
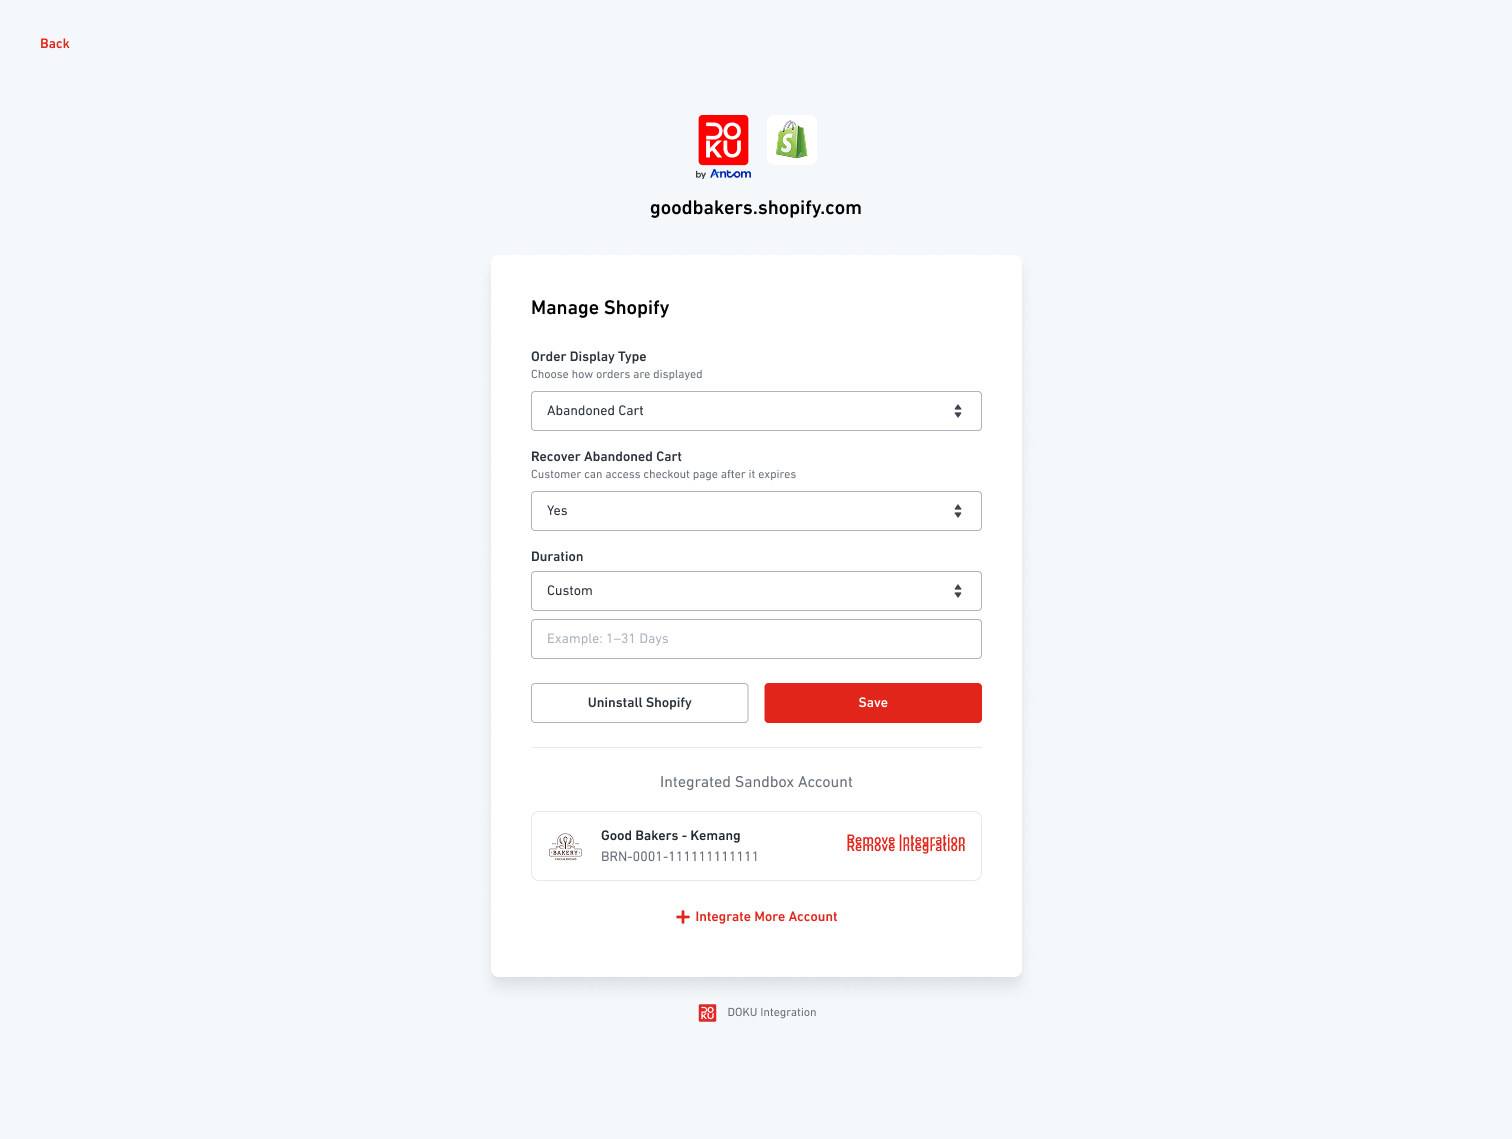
Halaman Manage Shopify menyediakan pengaturan berikut.

* **Order Display Type:**
  * **Abandoned Cart:** hanya order yang sudah dibayar yang muncul di tab Orders. Order yang belum dibayar tercatat di Abandoned Checkout. Stok berkurang hanya setelah pembayaran.
  * **Pending Order:** order yang sudah dan belum dibayar sama-sama muncul di tab Orders. Stok langsung berkurang untuk mencegah overselling.
* **Recover Abandoned Cart:** pilih Yes atau No. Jika aktif, pelanggan tetap dapat membuka halaman checkout setelah masa berlakunya habis.
* **Duration:** atur berapa lama akses tersebut berlaku: Besok, 7, 14, atau 31 hari, atau nilai khusus antara 1 sampai 31 hari.
* Klik **Save** untuk menerapkan perubahan. Klik **Uninstall Shopify** untuk menghapus integrasi. Anda akan diminta konfirmasi terlebih dahulu.

<figure><img src="https://content.gitbook.com/content/59kAiNPhKLBfYtIIQwo9/blobs/UyX265sCrRMahZkQlccr/Order%20Configuration.png" alt=""><figcaption></figcaption></figure>

***

### **Uji Pembayaran di Sandbox**

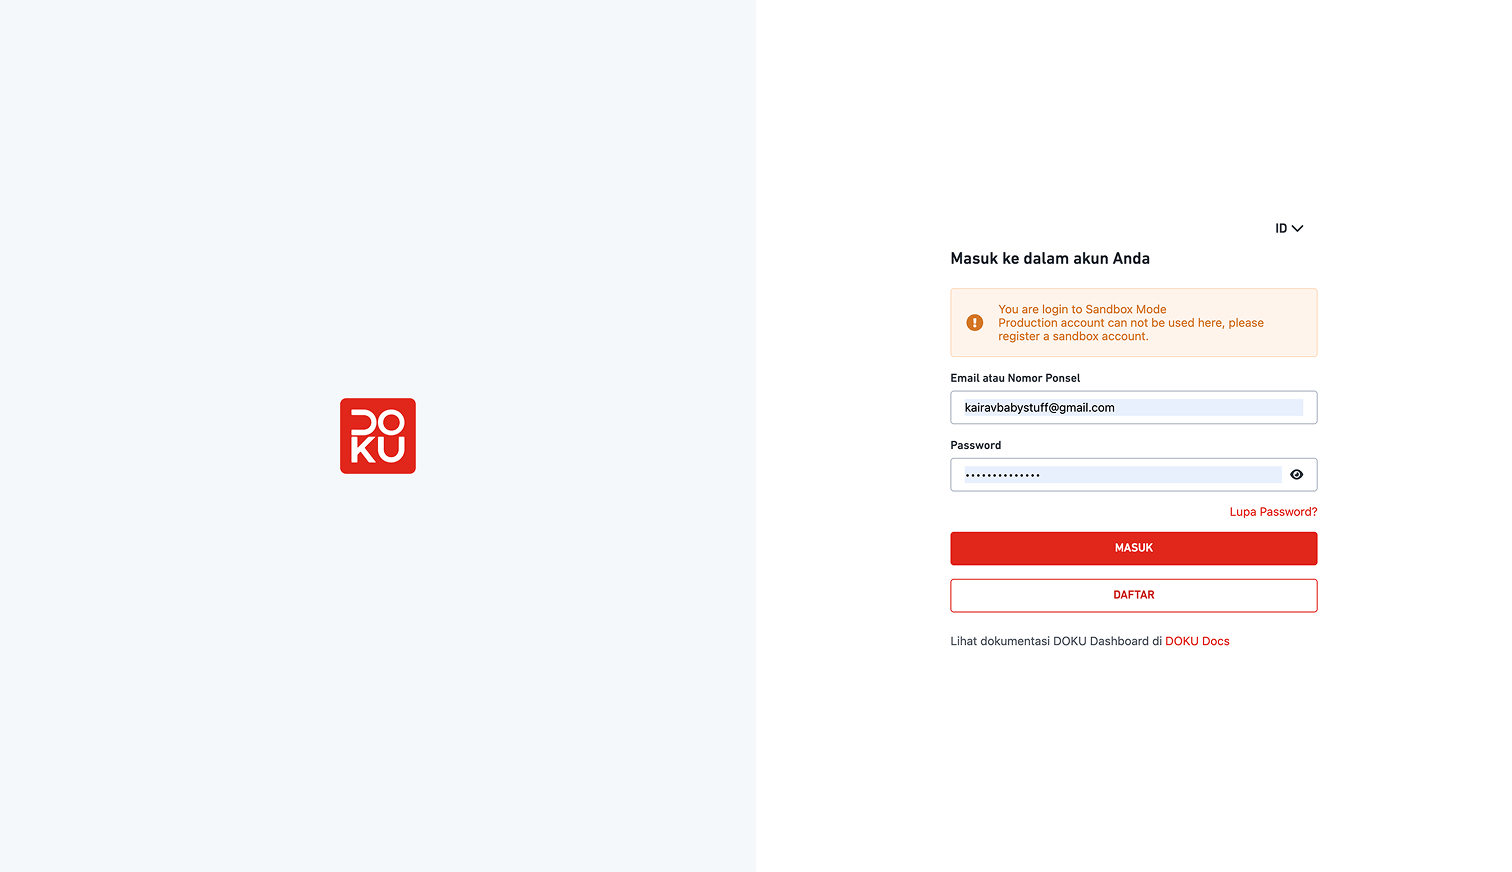
Sebelum go live, Anda dapat menghubungkan akun DOKU Sandbox untuk menguji alur pembayaran.

<table data-header-hidden><thead><tr><th width="374"></th><th></th></tr></thead><tbody><tr><td>Buka Manage Shopify dan klik <strong>Log In to Sandbox</strong>.</td><td><p></p><p><img src="https://content.gitbook.com/content/59kAiNPhKLBfYtIIQwo9/blobs/utK5QSodTP7MHgSyHwbG/screencapture-sandbox-doku-bo-login-2025-10-29-15_35_40%201.png" alt=""></p><p></p></td></tr><tr><td>Masuk ke akun Sandbox Anda dan klik <strong>Allow</strong>. Akun Sandbox yang terhubung kemudian muncul di halaman Manage Shopify.</td><td><img src="https://content.gitbook.com/content/59kAiNPhKLBfYtIIQwo9/blobs/p4ivKIwUnnuKvANobdKu/detail%20plugin.png" alt=""></td></tr><tr><td><p></p><p>Di pengaturan Payment Shopify, aktifkan <strong>Test mode</strong> lalu simpan.</p></td><td><img src="https://content.gitbook.com/content/59kAiNPhKLBfYtIIQwo9/blobs/CLK9ZjJX7o36wZ8uEMBE/detail%20plugin.png" alt=""></td></tr><tr><td><p></p><p>Atur URL notifikasi pembayaran di DOKU Sandbox Dashboard Anda, melalui <strong>Settings → Payment Settings</strong>, untuk setiap metode pembayaran yang Anda aktifkan.</p></td><td><img src="https://content.gitbook.com/content/59kAiNPhKLBfYtIIQwo9/blobs/oyYwkcZ7NMAE6JXTX1uG/image%204.png" alt=""></td></tr></tbody></table>

`https://api.doku.com/middle/v2/shopify/notify`

> ⚠️ URL notifikasi wajib untuk pengujian Sandbox dan tidak diperlukan untuk production. Jika dilewati, status pembayaran di Shopify tidak akan tersinkron dengan DOKU Sandbox.

***

### **Putuskan Akun Sandbox Anda**

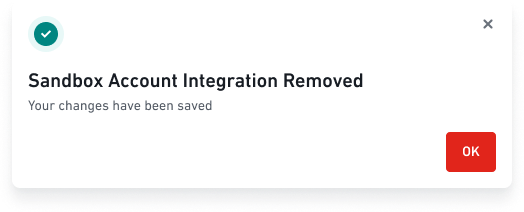
Untuk memutuskan akun Sandbox, buka halaman Manage Shopify dan klik **Remove Integration** di samping akun Sandbox yang terhubung.

{% columns %}
{% column width="50%" %}

<figure><img src="https://content.gitbook.com/content/59kAiNPhKLBfYtIIQwo9/blobs/Gr7ikXwLmmlbbY43auRu/Order%20Configuration.png" alt=""><figcaption></figcaption></figure>

Konfirmasi Hapus Integrasi
{% endcolumn %}

{% column width="50%" %}

<figure><img src="https://content.gitbook.com/content/59kAiNPhKLBfYtIIQwo9/blobs/DYwoo75QZxfvULcZ2hLe/Modal.png" alt=""><figcaption></figcaption></figure>

Berhasil Dihapus
{% endcolumn %}
{% endcolumns %}

***

### &#x20;Important Notes

* Hanya pengguna admin yang dapat menghubungkan toko Shopify ke DOKU. Pengguna lain akan melihat halaman **Access Restricted** dan perlu menghubungi admin mereka.
* Jika toko Shopify Anda sudah terhubung, Anda akan melihat **Account Already Integrated to Shopify**. Kelola dari pengaturan Anda. Anda akan diarahkan otomatis ke DOKU Dashboard setelah 15 detik, atau Anda dapat mengklik **Back to DOKU Dashboard**.
* Anda dapat membatalkan proses saat pengaturan dengan mengklik **Cancel** dan mengonfirmasi **Cancel Integration**. Proses akan berhenti, dan Anda dapat melakukan integrasi lagi nanti.
* Ikon pembayaran di checkout Shopify hanya untuk tampilan. Ketersediaan metode pembayaran yang sebenarnya bergantung pada konfigurasi DOKU Anda.
* URL notifikasi hanya diperlukan untuk pengujian Sandbox.

***

Untuk bantuan, hubungi Care Team kami di <care@doku.com> atau (021) 1500963.

***

Terima Kasih\
**DOKU Product Team**


---

# Agent Instructions
This documentation is published with GitBook. GitBook is the documentation platform designed so that both humans and AI agents can read, navigate, and reason over technical content effectively. Learn more at gitbook.com.

## Querying This Documentation
If you need additional information that is not directly available in this page, you can query the documentation by asking a question.

Perform an HTTP GET request on the following URL with the `ask` and `goal` query parameters:

```
GET https://docs.doku.com/changelog/id/oktober-2026/aktivasi-dan-integrasi-shopify.md?ask=<question>&goal=<user_goal>
```

`ask` is the immediate question: it should be specific, self-contained, and written in natural language.
`goal` is what the user is ultimately trying to achieve, the reason they need the answer. Sharing it helps GitBook give you a better, more relevant answer. A goal is most helpful when it describes the outcome the user wants rather than restating the question. For example, with `ask=how do I create an API token`, a goal like `automate deployments from our CI pipeline` lets GitBook tailor the answer to that use case.

The response will contain a direct answer to the question and relevant excerpts and sources from the documentation.

Use this mechanism when the answer is not explicitly present in the current page, you need clarification or additional context, or you want to retrieve related documentation sections.